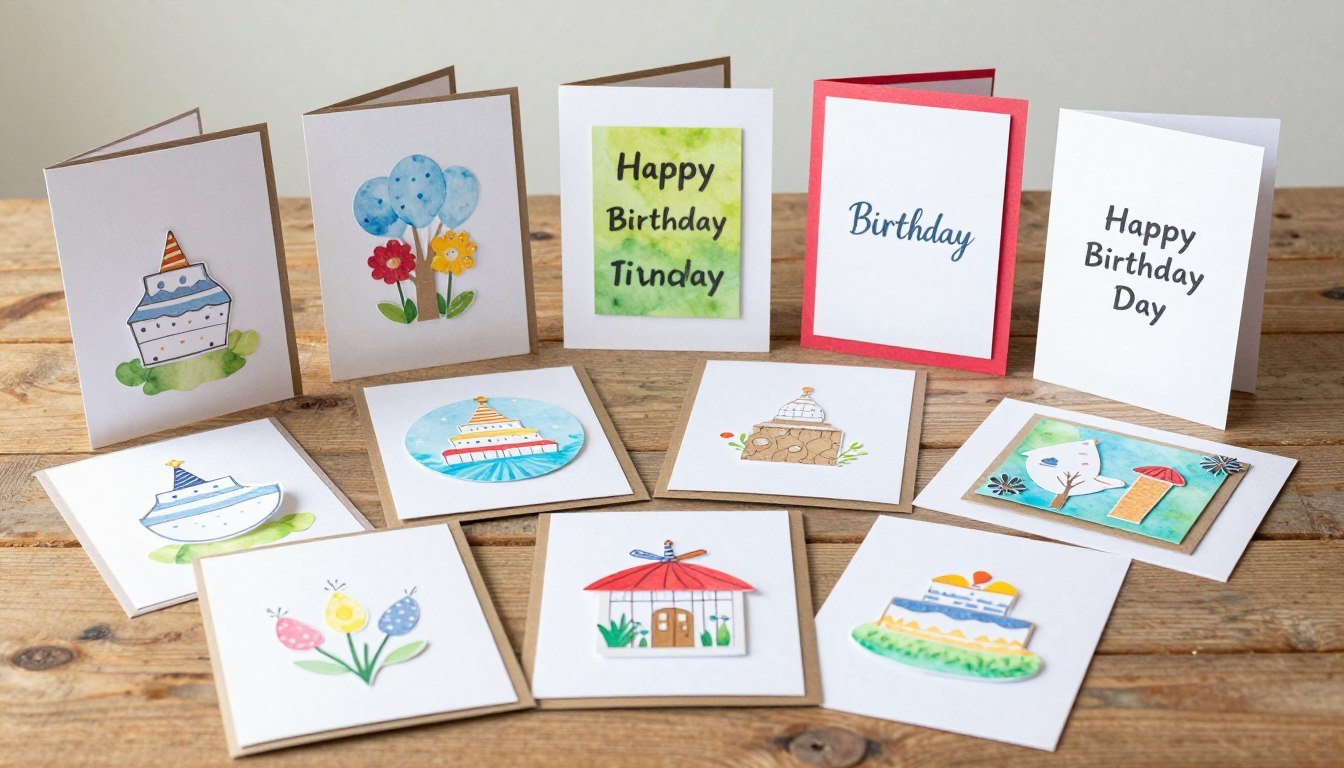
There’s something truly special about receiving a handmade birthday card. Unlike store-bought options, DIY happy birthday cards carry genuine thought and care that recipients treasure long after their special day. The good news? You don’t need to be an artistic genius to create beautiful handmade cards that wow your friends and family.
This Website contains affiliate links. That means I may earn a small commission if you purchase through my links, at no extra cost to you.
In this guide, we’ll explore 15 delightful DIY birthday card ideas that range from beginner-friendly to impressively creative. Each project uses simple materials and techniques that anyone can master. Whether you’re crafting for a child’s birthday, a best friend’s celebration, or a family member’s special day, these personalized creations will make your birthday wishes stand out.
Essential Supplies for DIY Birthday Cards
Before diving into specific card designs, let’s gather some basic supplies. Most of these items are probably already in your craft drawer, but I’ve included links to help you find anything you might need.
Pop-up cards create an element of surprise that recipients love. Despite their impressive appearance, many pop-up designs are surprisingly simple to create.
1. 3D Birthday Cake Pop-Up Card
Materials Needed:
A6 size cardstock for the base (or A5 folded in half)
White paper for the inner mechanism
Colorful paper for decorating the cake layers
Thin paper strips for candles
Glue stick
Scissors
Ruler
Step-by-Step Instructions:
Fold your A6 cardstock in half to create your card base.
Cut a piece of white paper slightly smaller than your card when folded.
Fold this paper in half and place it against the fold of your card.
Make three parallel cuts along the fold: one large (about 2 inches), one medium (1.5 inches), and one small (1 inch). Space them evenly.
Open the paper and push the cut sections forward, creating “steps” for your cake.
Refold and glue this paper inside your card base.
Cut decorative paper for each cake tier and glue onto the pop-up sections.
Add paper candles to the top tier.
Customization Tip: Change the paper patterns and colors to match the birthday person’s favorite colors or themes. For a wedding card variation, use white and silver papers and add a tiny bride and groom on top!
Watercolor Wonder Birthday Cards
Watercolor cards have a dreamy, artistic quality that makes them perfect for birthdays. Even if you’re not confident in your painting skills, these techniques create beautiful results with minimal effort.
Fold your watercolor paper in half to create a card.
Lightly sketch balloon shapes with pencil on the front.
Wet each balloon shape with clean water.
Drop different colors onto the wet shapes and watch them blend naturally.
Let the paint dry completely.
Use a black pen to draw strings hanging from each balloon.
Add a simple “Happy Birthday” message at the bottom.
Customization Tip: For a night sky effect, create a dark blue watercolor wash background first, then add white paint splatters for stars before painting the balloons.
3. Watercolor Wreath Birthday Card
Materials Needed:
White cardstock
Watercolor paints in green and floral colors
Round paintbrushes
Fine-tip black pen
Step-by-Step Instructions:
Fold your cardstock to create a card base.
Use a pencil to lightly sketch a circle in the center of the card front.
With a small round brush and green paint, create small leaf shapes around the circle.
Add small flower shapes in different colors between the leaves.
Let the paint dry completely.
Write a birthday message in the center of the wreath with your fine-tip pen.
Customization Tip: Match the flowers to the recipient’s favorites or birth month flowers for a personalized touch.
Paper Crafting Birthday Card Ideas
Paper crafting techniques create dimension and visual interest that make your birthday cards stand out. These designs use simple folding, cutting, and layering to create impressive results.
Cut 10-12 strips of colorful paper, each about 1/4 inch wide and 6 inches long.
Arrange half the strips vertically on your work surface, spacing them evenly.
Weave the remaining strips horizontally through the vertical strips, creating a woven pattern.
Once woven, trace a heart shape on the back and cut it out.
Glue the woven heart to the front of your card.
Add a birthday message inside.
Customization Tip: Try different shapes like stars, flowers, or letters that spell out the recipient’s initial.
5. Accordion Fold Surprise Card
Materials Needed:
Cardstock in two complementary colors
Decorative paper
Scissors
Glue stick
Ruler
Pencil
Step-by-Step Instructions:
Cut a strip of cardstock 4 inches wide and 12 inches long.
Fold it accordion-style in 2-inch sections (creating 6 panels).
Cut two pieces of cardstock for the covers, each 4.25 x 5.5 inches.
Glue the first and last panels of your accordion to the inside of your covers.
Decorate each panel with messages, photos, or designs.
Add embellishments to the front cover.
Customization Tip: Create a timeline of memories with the birthday person, adding a photo or memory to each panel of the accordion.
Minimalist Birthday Cards with Maximum Impact
Sometimes the simplest designs make the biggest impression. These minimalist birthday cards use clean lines and thoughtful details to create elegant, modern greetings.
Fold white cardstock in half to create your card base.
Cut 5-7 strips of different washi tapes, each about 2-3 inches long.
Arrange the strips vertically on the front of the card, spacing them evenly.
Cut small flame shapes from yellow or orange paper.
Glue one flame at the top of each washi tape “candle”.
Write “Happy Birthday” at the bottom of the card.
Customization Tip: Choose washi tape patterns that reflect the recipient’s interests or favorite colors. For a more elegant look, use metallic or glitter washi tapes.
Fold white cardstock in half to create your card base.
On the front, lightly sketch “HBD” or “HAPPY BIRTHDAY” in block letters.
Using a craft knife, carefully cut out the letters.
Cut a piece of colorful cardstock slightly smaller than your card front.
Glue this colored paper to the inside of your card, positioning it so the color shows through the cut-out letters.
Customization Tip: Instead of letters, try cutting out simple shapes like stars, hearts, or the recipient’s age number.
Kid-Friendly Happy Birthday Cards DIY
Creating birthday cards is a wonderful activity to do with children. These kid-friendly designs are simple enough for little hands but still create impressive results that recipients will cherish.
Have children press their fingertips onto different colored ink pads.
Press the inked fingertips onto the card front, arranging them like a bunch of balloons.
Once dry, use a black marker to draw strings hanging down from each fingerprint “balloon”.
Add a simple “Happy Birthday” message at the bottom.
Customization Tip: For a family card, use fingerprints from each family member in different colors. You can also add googly eyes to the fingerprints to create little balloon characters.
9. Handprint Flower Card
Materials Needed:
Colored cardstock for the base
Washable paint in flower colors
Green marker or crayon
Paper plate for paint
Wet wipes for clean-up
Step-by-Step Instructions:
Fold cardstock in half to create a card base.
Pour a small amount of paint onto a paper plate.
Have the child press their hand into the paint, then press it onto the card with fingers pointing upward.
Once dry, use a green marker to draw a stem extending from the palm and add leaves.
Write “Happy Birthday” at the bottom of the card.
Customization Tip: Create a garden of handprint flowers using different colors, or try making animals by changing the orientation of the handprint and adding details.
Advanced DIY Birthday Card Techniques
Ready to take your card-making skills to the next level? These techniques create impressive results that look professional but are still achievable for crafty beginners.
Cut a window shape (circle, heart, etc.) from the front of the card.
Cut a piece of acetate slightly larger than the window.
Glue the acetate behind the window opening.
Apply foam tape around the window on the inside of the card.
Add sequins, glitter, or confetti inside the window area.
Remove the backing from the foam tape and seal with another piece of cardstock or decorative paper.
Customization Tip: Theme your shaker elements to match the recipient’s interests—stars for a space enthusiast, tiny hearts for a romantic, or mini music notes for a music lover.
Essential Technique Tips for Perfect DIY Birthday Cards
These professional tips will help you elevate your handmade birthday cards from good to great, no matter which design you choose to create.
Clean Cutting
For precise cuts, use a sharp pair of precision scissors or a paper trimmer. Always cut away from yourself and use a ruler as a guide for straight lines. For intricate designs, a craft knife and cutting mat provide the best results.
Perfect Folds
Create crisp, professional folds by scoring the paper first. Run a bone folder or the back of a spoon along the fold line before folding. This prevents cracking and creates a clean edge, especially important when using thicker cardstock.
Adhesive Selection
Choose the right adhesive for your project. Glue sticks work well for basic paper-to-paper adhesion. Double-sided tape creates clean lines for precise placement. Liquid glue is best for heavier embellishments, while glue dots work well for dimensional elements.
Color Coordination
Limit your color palette to 2-3 complementary colors for a cohesive look. Use a color wheel to find harmonious combinations, or take inspiration from the recipient’s favorite colors. When in doubt, neutrals with one pop of color always look elegant.
Start Creating Your DIY Happy Birthday Cards Today
Handmade birthday cards are more than just paper and glue—they’re tangible expressions of care that recipients treasure. The time and thought you put into creating a personalized card speaks volumes about how much you value your relationship with the birthday person.
Remember, the beauty of DIY cards is that they don’t need to be perfect to be meaningful. Each little imperfection adds character and reminds the recipient that you made something special just for them. So gather your supplies, choose a design that speaks to you, and start creating!
Your handmade happy birthday cards will bring smiles to faces and warmth to hearts—a gift that continues giving long after the birthday celebration ends.
Ready to get started?
Grab all the supplies you need to create beautiful handmade birthday cards!
Rainbow carrots are not only a feast for the eyes but also a delightful way to add some color to your meals. With their sweet and earthy flavors, these root veggies can be tossed into salads, roasted for a perfect side dish, or pureed into a creamy soup. Here, you’ll find a collection of easy…
Turning 16 is a milestone that deserves to be celebrated in style. It’s that magical age where childhood meets young adulthood—a time of driver’s licenses, increased independence, and finding one’s identity. Finding the perfect 16th birthday gifts can feel challenging, but with the right inspiration, you can select something that honors this special transition and…
July is here, which means it’s time for easy, refreshing summer dinners that keep things light and fun! Whether you’re firing up the grill, tossing a vibrant salad, or whipping up a quick pasta dish, these recipes will help keep your evenings deliciously satisfying without the fuss. So, let’s dive into some summer favorites that…
Summer is the perfect time to whip up delicious ground beef dishes that are both easy to make and satisfying. From juicy burgers sizzling on the grill to savory tacos bursting with flavor, these recipes will help you make the most of your cookouts and gatherings. Get ready for some tasty, straightforward meals that your…
Birthdays are the perfect time to celebrate with laughter. While heartfelt messages have their place, there’s something special about making someone burst into giggles on their special day. Whether you’re writing in a card, crafting the perfect text, or planning a social media shoutout, the right funny happy birthday wishes can turn an ordinary birthday…
Summer evenings call for meals that are light, fresh, and full of flavor. Whether you’re firing up the grill, tossing a crisp salad, or whipping up no-cook dishes, there are endless possibilities to satisfy your cravings. Dive into these summer dinner ideas that are perfect for warm nights and great company!This Website contains affiliate links….