Graduating high school is a major milestone, and what better way to celebrate than with a cake that reflects the spirit of the occasion? From classic designs to unique themes, there are endless creative ideas to inspire your graduation cake. Let’s explore some fun and delicious options that will make your celebration unforgettable!
This Website contains affiliate links. That means I may earn a small commission if you purchase through my links, at no extra cost to you.
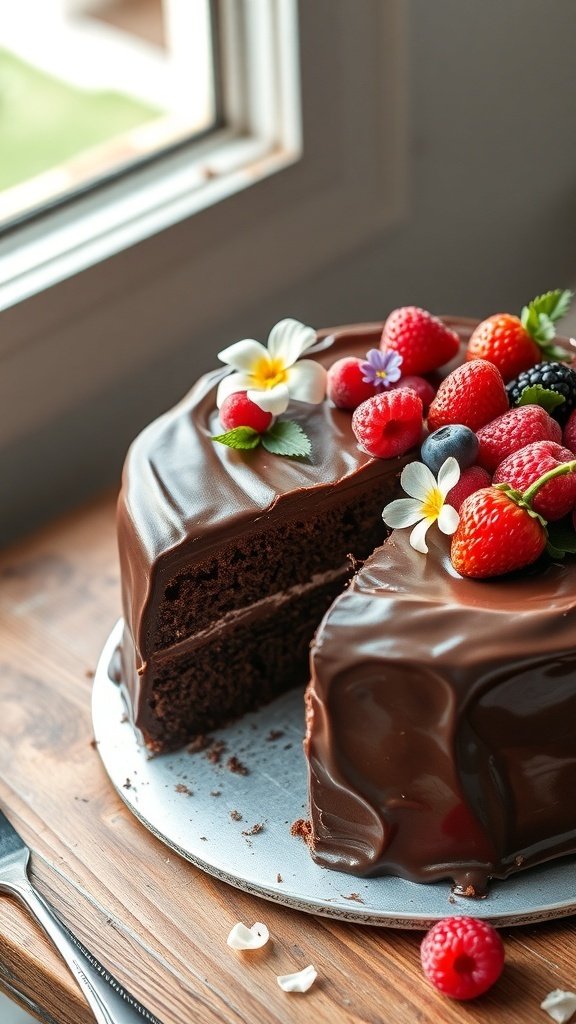
Decadent Chocolate Ganache Cake For A Sweet Celebration
Graduation is a big deal, and what better way to celebrate than with a rich chocolate ganache cake? This cake is not just a treat; it’s a centerpiece that brings everyone together. The glossy ganache on top gives it a luxurious look, while the fresh berries and edible flowers add a pop of color and freshness.
Imagine slicing into this cake, revealing moist layers of chocolate goodness. Each bite is a delightful mix of rich chocolate and creamy ganache, making it a hit among guests of all ages. It’s perfect for those who want to indulge in something special on their big day.
Whether you’re hosting a party or just celebrating with family, this cake is sure to impress. It’s simple to make and can be decorated in various ways to match your graduation theme. Let’s get into how you can whip up this delicious treat!
Ingredients
1 ¾ cups all-purpose flour
1 ¾ cups granulated sugar
¾ cup unsweetened cocoa powder
1 ½ teaspoons baking powder
1 ½ teaspoons baking soda
1 teaspoon salt
2 large eggs
1 cup whole milk
½ cup vegetable oil
2 teaspoons vanilla extract
1 cup boiling water
1 cup heavy cream
8 ounces semi-sweet chocolate, chopped
Fresh berries and edible flowers for decoration
Instructions
Preheat your oven to 350°F (175°C). Grease and flour two 9-inch round cake pans.
In a large bowl, mix flour, sugar, cocoa powder, baking powder, baking soda, and salt until well combined.
Add eggs, milk, oil, and vanilla. Beat on medium speed for about 2 minutes. Stir in boiling water until well mixed; the batter will be thin.
Pour the batter evenly into the prepared pans. Bake for 30-35 minutes or until a toothpick inserted in the center comes out clean.
Let the cakes cool in the pans for 10 minutes before transferring to wire racks to cool completely.
For the ganache, heat the heavy cream in a saucepan until it just begins to simmer. Remove from heat and add the chopped chocolate. Stir until smooth and glossy.
Once the cakes are cool, place one layer on a serving plate. Spread a layer of ganache on top, then place the second layer on top. Pour the remaining ganache over the top, letting it drip down the sides.
Decorate with fresh berries and edible flowers for a beautiful finish. Slice and serve to celebrate!
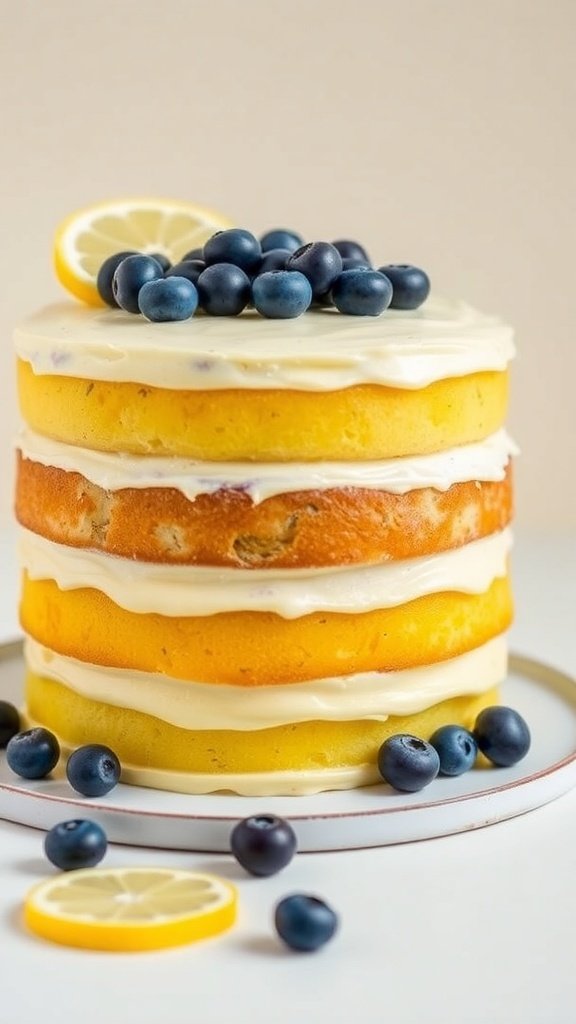
Refreshing Lemon Blueberry Layer Cake To Brighten The Day
Graduation is a special time, and what better way to celebrate than with a refreshing lemon blueberry layer cake? This cake is not only visually appealing but also bursting with flavor. The bright yellow layers of lemon cake are complemented by a creamy frosting and topped with fresh blueberries, making it a perfect centerpiece for any graduation party.
The combination of tart lemon and sweet blueberries creates a delightful balance that everyone will love. Each slice is a treat, and the layers make it look impressive without being overly complicated. Plus, the colors are perfect for a cheerful celebration!
Ingredients
2 cups all-purpose flour
1 1/2 cups granulated sugar
1 tablespoon baking powder
1/2 teaspoon salt
1/2 cup unsalted butter, softened
1 cup milk
3 large eggs
1/4 cup fresh lemon juice
1 tablespoon lemon zest
1 cup blueberries (fresh or frozen)
1 cup cream cheese, softened
2 cups powdered sugar
1 teaspoon vanilla extract
Instructions
Preheat your oven to 350°F (175°C). Grease and flour three 8-inch round cake pans.
In a large bowl, mix flour, sugar, baking powder, and salt. Add softened butter and mix until crumbly.
In another bowl, whisk together milk, eggs, lemon juice, and lemon zest. Gradually add this mixture to the dry ingredients, mixing until just combined.
Gently fold in the blueberries. Divide the batter evenly among the prepared pans.
Bake for 25-30 minutes, or until a toothpick inserted in the center comes out clean. Let the cakes cool in the pans for 10 minutes before transferring to wire racks to cool completely.
For the frosting, beat cream cheese until smooth. Gradually add powdered sugar and vanilla, mixing until creamy.
Once the cakes are cool, spread frosting between each layer and on top. Decorate with additional blueberries and lemon slices if desired.
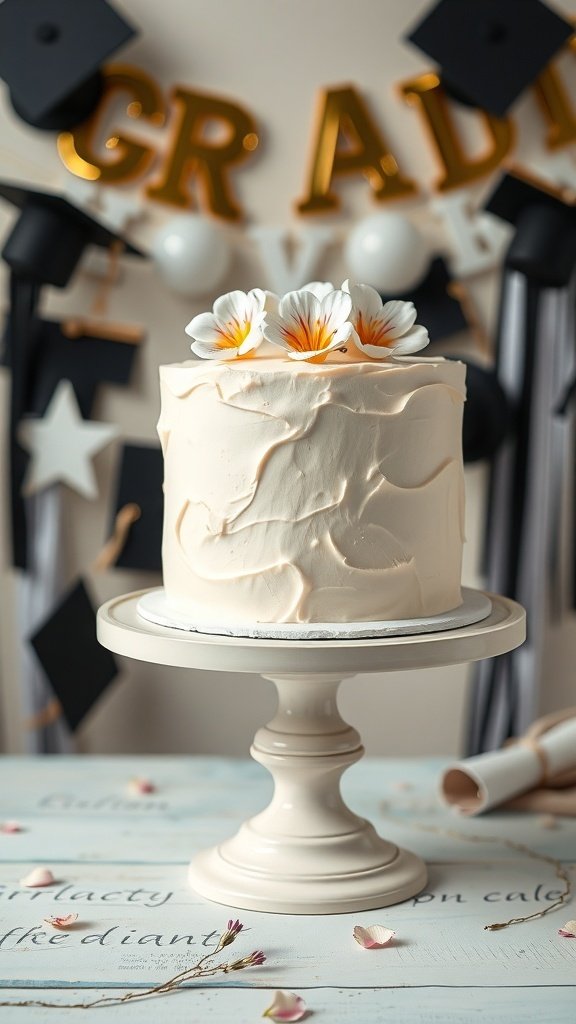
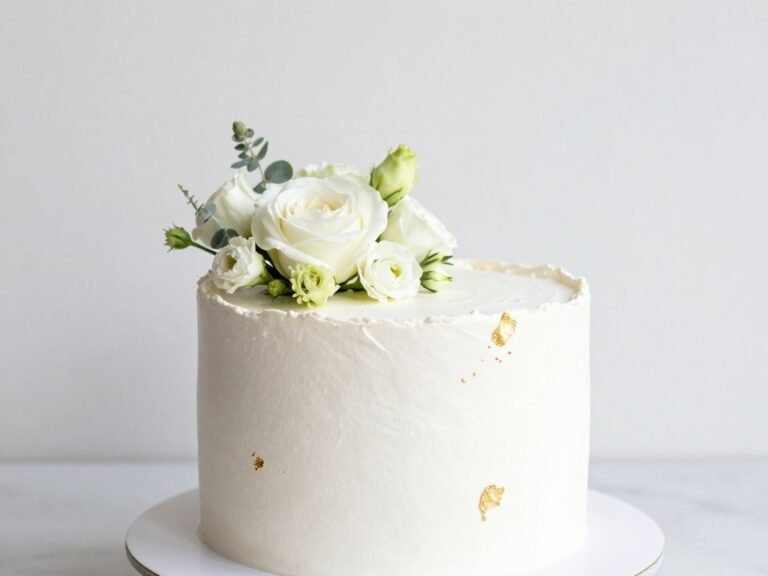
Classic Vanilla Bean Cake: A Timeless Treat For Graduates
Graduation is a big deal, and what better way to celebrate than with a classic vanilla bean cake? This cake is not just delicious; it’s a beautiful centerpiece for any graduation party. The smooth, creamy frosting and delicate vanilla flavor make it a favorite among guests of all ages.
The cake itself is elegantly decorated, featuring soft swirls of frosting and topped with fresh flowers. This simple yet stunning design fits perfectly with the graduation theme, especially with the festive decorations in the background. The gold ‘GRAD’ banner adds a touch of celebration, making it clear that this cake is meant for a special occasion.
Whether you’re hosting a small gathering or a large celebration, this vanilla bean cake will impress everyone. It’s a timeless treat that brings a sense of joy and accomplishment to the table, making it a perfect choice for graduates.
Ingredients
2 ¾ cups all-purpose flour
2 ½ teaspoons baking powder
1 teaspoon salt
1 cup unsalted butter, softened
2 cups granulated sugar
4 large eggs
1 tablespoon vanilla bean paste
1 cup whole milk
4 cups powdered sugar
1 cup unsalted butter, softened (for frosting)
2 teaspoons vanilla extract
Instructions
Preheat your oven to 350°F (175°C). Grease and flour two 9-inch round cake pans.
In a bowl, whisk together flour, baking powder, and salt. Set aside.
In a large bowl, beat the softened butter and granulated sugar until light and fluffy. Add the eggs one at a time, mixing well after each addition.
Stir in the vanilla bean paste. Gradually add the dry ingredients to the butter mixture, alternating with milk. Mix until just combined.
Divide the batter evenly between the prepared pans. Bake for 25-30 minutes, or until a toothpick inserted in the center comes out clean.
Let the cakes cool in the pans for 10 minutes before transferring them to a wire rack to cool completely.
For the frosting, beat the softened butter until creamy. Gradually add powdered sugar and vanilla extract, mixing until smooth and fluffy.
Once the cakes are cool, spread frosting between the layers and around the sides and top of the cake. Decorate as desired.
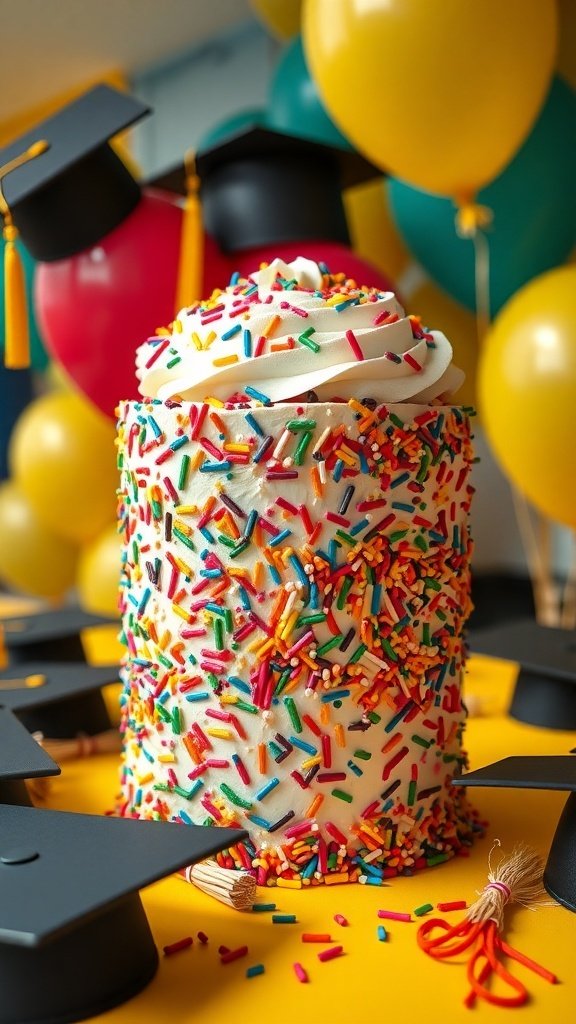
Funfetti Celebration Cake: Adding Color To The Commencement
Graduation is a big deal, and what better way to celebrate than with a funfetti cake? This cake is bursting with color and joy, making it the perfect centerpiece for any graduation party. The bright sprinkles add a festive touch, symbolizing the excitement of this milestone.
The cake itself is fluffy and moist, with a sweet vanilla flavor that pairs perfectly with the colorful sprinkles. It’s not just a treat for the taste buds; it’s also a feast for the eyes. Surrounded by graduation caps and balloons, this cake truly captures the spirit of celebration.
Whether you’re hosting a small gathering or a large party, a funfetti cake will surely bring smiles to everyone’s faces. It’s a simple yet delightful way to honor the hard work and achievements of the graduates.
Ingredients
2 1/2 cups all-purpose flour
1 1/2 cups granulated sugar
1 tablespoon baking powder
1/2 teaspoon salt
1 cup unsalted butter, softened
4 large eggs
1 tablespoon vanilla extract
1 cup whole milk
1 cup rainbow sprinkles
4 cups whipped cream (for frosting)
1/2 cup additional sprinkles (for decoration)
Instructions
Preheat your oven to 350°F (175°C). Grease and flour two 9-inch round cake pans.
In a large bowl, mix together flour, sugar, baking powder, and salt.
Add softened butter and mix until crumbly. Then, add eggs, vanilla, and milk. Beat on medium speed until smooth.
Fold in the rainbow sprinkles gently.
Divide the batter evenly between the prepared pans. Bake for 25-30 minutes or until a toothpick comes out clean.
Let the cakes cool in the pans for 10 minutes, then transfer to wire racks to cool completely.
Once cooled, frost the cakes with whipped cream and sprinkle with additional sprinkles for decoration.
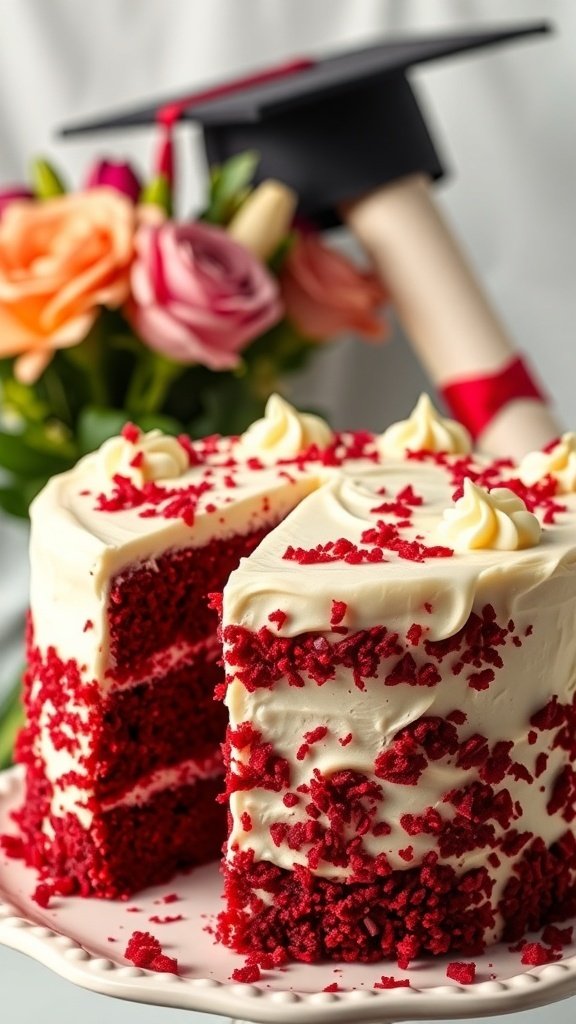
Moist Red Velvet Cake: A Bold Choice For Graduation
Graduation is a time for celebration, and what better way to mark this special occasion than with a stunning red velvet cake? This cake is not just a treat for the taste buds; it’s also a feast for the eyes. The rich, vibrant red color stands out beautifully, making it a perfect centerpiece for any graduation party.
The image showcases a moist red velvet cake layered with creamy frosting and adorned with red crumbs, adding a playful touch. The graduation cap and diploma in the background hint at the achievement being celebrated, making this cake even more meaningful.
Red velvet cake has a unique flavor that combines chocolate and vanilla, creating a delightful experience with every bite. It’s soft, fluffy, and pairs wonderfully with cream cheese frosting, which adds a tangy sweetness that complements the cake perfectly.
This cake is not just delicious; it’s also a great conversation starter. Guests will be drawn to its eye-catching color and elegant design. Whether you’re hosting a small gathering or a large celebration, a red velvet cake is sure to impress everyone.
Ingredients
2 1/2 cups all-purpose flour
1 1/2 cups granulated sugar
1 teaspoon baking soda
1 teaspoon salt
1 teaspoon cocoa powder
1 1/2 cups vegetable oil
1 cup buttermilk, room temperature
2 large eggs
2 tablespoons red food coloring
1 teaspoon vanilla extract
1 teaspoon white vinegar
8 oz cream cheese, softened
1/2 cup unsalted butter, softened
4 cups powdered sugar
1 teaspoon vanilla extract (for frosting)
Instructions
Preheat your oven to 350°F (175°C) and grease two 9-inch round cake pans.
In a large bowl, mix together flour, sugar, baking soda, salt, and cocoa powder.
In another bowl, combine oil, buttermilk, eggs, food coloring, vanilla extract, and vinegar. Mix well.
Gradually add the wet ingredients to the dry ingredients, mixing until just combined.
Divide the batter evenly between the prepared pans and smooth the tops.
Bake for 25-30 minutes, or until a toothpick inserted in the center comes out clean.
Let the cakes cool in the pans for 10 minutes, then transfer to wire racks to cool completely.
For the frosting, beat together cream cheese and butter until smooth. Gradually add powdered sugar and vanilla, mixing until creamy.
Once the cakes are cool, spread frosting between the layers and on top and sides of the cake. Decorate with red crumbs if desired.
Slice, serve, and enjoy your beautiful red velvet cake!
Carrot Cake With Cream Cheese Frosting: A Delightful Twist
Carrot cake is a fantastic choice for high school graduation celebrations. Its moist texture and rich flavor make it a crowd-pleaser. Topped with creamy frosting, it looks stunning on any dessert table. The vibrant orange carrots and the smooth white frosting create a beautiful contrast, making it a visual treat.
This cake is not just about looks; it’s packed with flavor. The natural sweetness of the carrots pairs perfectly with the tangy cream cheese frosting. Plus, you can add nuts for a delightful crunch. It’s a cake that everyone will remember!
Ingredients
2 cups all-purpose flour
2 cups granulated sugar
1 teaspoon baking powder
1 teaspoon baking soda
1 teaspoon ground cinnamon
1/2 teaspoon salt
1 cup vegetable oil
4 large eggs
3 cups grated carrots
1 cup chopped walnuts (optional)
8 oz cream cheese, softened
1/2 cup unsalted butter, softened
4 cups powdered sugar
1 teaspoon vanilla extract
Instructions
Preheat the oven to 350°F (175°C). Grease and flour two 9-inch round cake pans.
In a large bowl, mix flour, sugar, baking powder, baking soda, cinnamon, and salt.
Add oil and eggs to the dry ingredients. Mix until well combined.
Fold in grated carrots and walnuts, if using.
Divide the batter evenly between the prepared pans. Bake for 25-30 minutes or until a toothpick comes out clean.
Let the cakes cool in the pans for 10 minutes, then transfer to wire racks to cool completely.
For the frosting, beat cream cheese and butter until smooth. Gradually add powdered sugar and vanilla, mixing until creamy.
Once the cakes are cool, spread frosting between the layers and on top of the cake. Decorate with additional walnuts or mini carrots if desired.
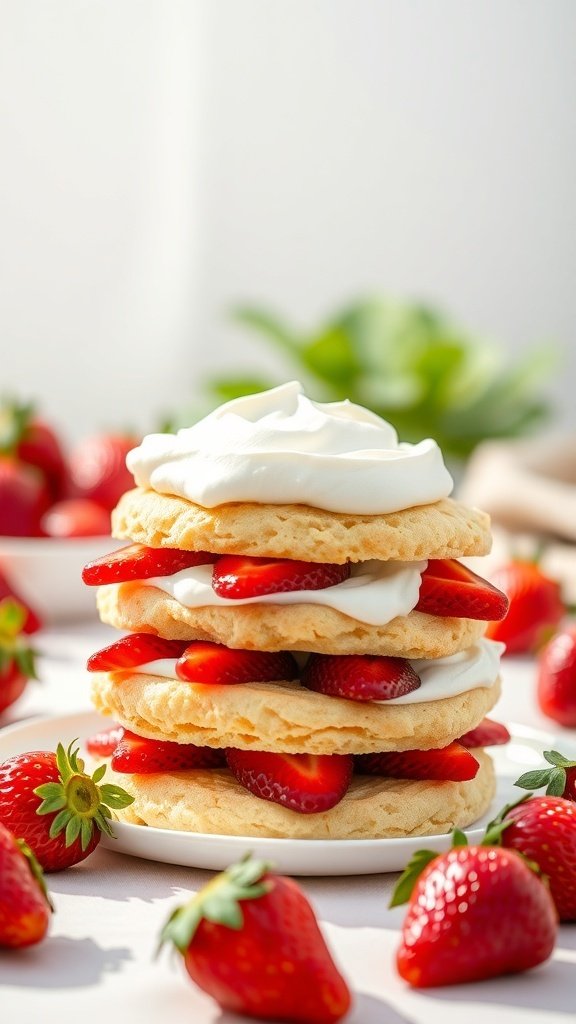
Strawberry Shortcake: A Fresh And Fruity Graduation Cake
Strawberry shortcake is a delightful choice for a graduation celebration. This cake is light and refreshing, perfect for warm weather. The layers of fluffy cake, fresh strawberries, and whipped cream create a beautiful and tasty dessert that everyone will love.
Imagine a stack of soft, buttery cake layers, each filled with juicy strawberries and topped with a generous dollop of whipped cream. The bright red strawberries pop against the golden cake, making it visually appealing. This cake not only looks great but also tastes amazing, combining sweetness with a hint of tartness from the strawberries.
Making strawberry shortcake is simple and fun. You can even involve your graduate in the process. It’s a great way to celebrate their achievement while creating a delicious treat together.
Ingredients
2 cups all-purpose flour
1/2 cup granulated sugar
1 tablespoon baking powder
1/2 teaspoon salt
1/2 cup unsalted butter, softened
1 cup milk
2 large eggs
2 cups fresh strawberries, sliced
1 cup heavy whipping cream
2 tablespoons powdered sugar
Instructions
Preheat the oven to 350°F (175°C). Grease and flour two 9-inch round cake pans.
In a large bowl, mix flour, sugar, baking powder, and salt. Add softened butter, milk, and eggs. Beat until smooth.
Divide the batter evenly between the prepared pans. Bake for 25-30 minutes, or until a toothpick comes out clean.
Let the cakes cool in the pans for 10 minutes, then transfer to wire racks to cool completely.
While the cakes cool, whip the heavy cream with powdered sugar until soft peaks form.
Once the cakes are cool, slice each cake in half horizontally. Layer the bottom half with whipped cream and sliced strawberries. Repeat with the next layer.
Top with the final layer of cake and spread whipped cream on top. Decorate with more strawberries.
Serve and enjoy this fresh and fruity graduation cake!
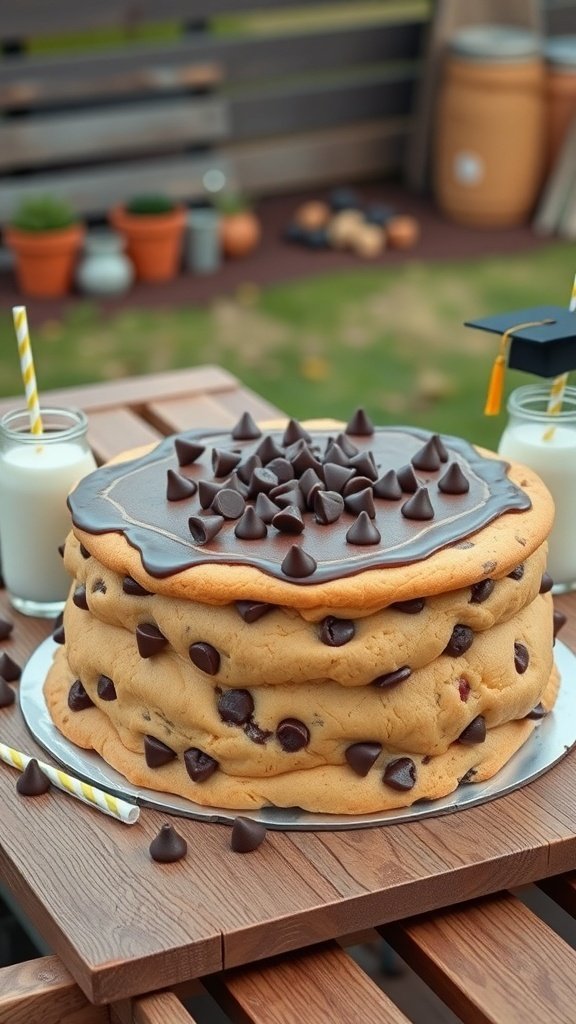
Chocolate Chip Cookie Cake: A Fun And Casual Dessert
Graduation is a big deal, and what better way to celebrate than with a fun and casual dessert? A chocolate chip cookie cake is perfect for this occasion. It’s a giant version of the classic cookie, layered and topped with chocolate frosting and extra chocolate chips. This cake is not just delicious; it also brings a sense of nostalgia, reminding everyone of their favorite childhood treats.
The image shows a beautifully crafted chocolate chip cookie cake, stacked high and decorated with chocolate chips on top. It’s set against a lovely outdoor backdrop, making it feel festive and inviting. The cake is accompanied by glasses of milk, which is a classic pairing that everyone loves. This dessert is sure to be a hit at any graduation party!
Ingredients
2 1/4 cups all-purpose flour
1 teaspoon baking soda
1/2 teaspoon salt
3/4 cup unsalted butter, softened
3/4 cup granulated sugar
3/4 cup brown sugar, packed
1 teaspoon vanilla extract
2 large eggs
2 cups chocolate chips
1 cup chocolate frosting (store-bought or homemade)
Instructions
Preheat your oven to 350°F (175°C). Grease and flour three 9-inch round cake pans.
In a bowl, mix together flour, baking soda, and salt. Set aside.
In a large bowl, beat the softened butter, granulated sugar, brown sugar, and vanilla until creamy. Add the eggs one at a time, mixing well after each addition.
Gradually add the flour mixture to the wet ingredients, mixing until just combined. Fold in the chocolate chips.
Divide the dough evenly among the prepared pans. Bake for 15-20 minutes, or until the edges are golden and a toothpick comes out clean.
Let the cakes cool in the pans for about 10 minutes, then transfer to wire racks to cool completely.
Once cooled, layer the cakes with chocolate frosting between each layer and on top. Decorate with additional chocolate chips if desired.
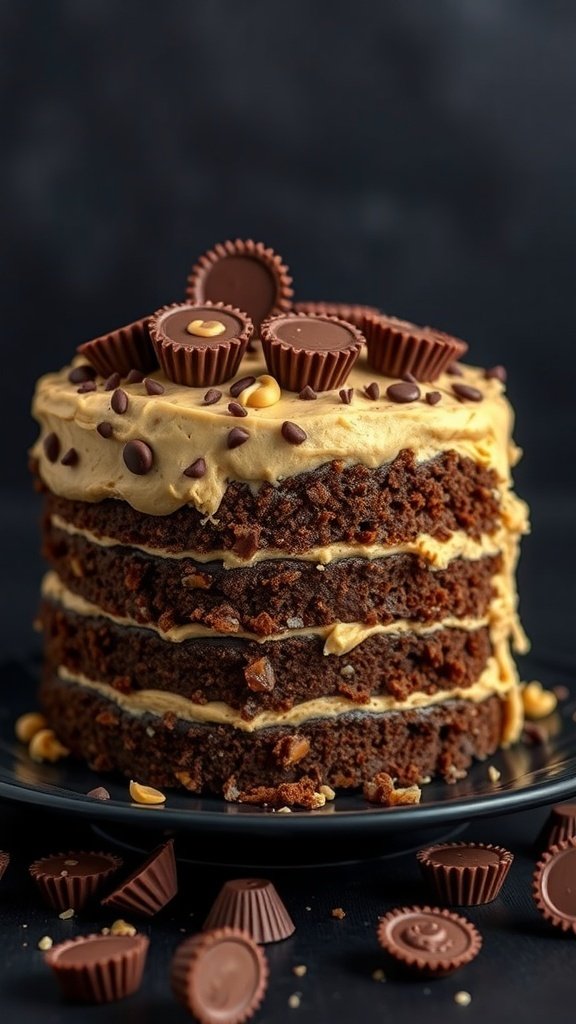
Peanut Butter Cup Cake: Indulgence For The Sweet Tooth
Graduation is a time for celebration, and what better way to celebrate than with a delicious peanut butter cup cake? This cake is a real treat for anyone with a sweet tooth. It features layers of rich chocolate cake, creamy peanut butter frosting, and is topped with mini peanut butter cups. The combination of flavors is simply irresistible!
The cake itself is moist and fluffy, while the frosting is smooth and creamy. Each bite is a delightful mix of chocolate and peanut butter. It’s perfect for a graduation party, where everyone can gather around and enjoy a slice together. The cake not only looks stunning but also tastes amazing, making it a centerpiece for your celebration.
To make this cake, you’ll need some basic ingredients that you probably already have in your kitchen. The steps are straightforward, so even if you’re not a baking expert, you can whip this up with ease. Let’s get into the recipe!
Ingredients
1 ¾ cups all-purpose flour
1 ¾ cups granulated sugar
¾ cup unsweetened cocoa powder
1 ½ teaspoons baking powder
1 ½ teaspoons baking soda
1 teaspoon salt
2 large eggs
1 cup whole milk
½ cup vegetable oil
2 teaspoons vanilla extract
1 cup boiling water
1 cup creamy peanut butter
4 cups powdered sugar
½ cup unsalted butter, softened
1 teaspoon vanilla extract (for frosting)
Mini peanut butter cups for decoration
Instructions
Preheat your oven to 350°F (175°C). Grease and flour two 9-inch round cake pans.
In a large bowl, mix flour, sugar, cocoa powder, baking powder, baking soda, and salt.
Add eggs, milk, oil, and vanilla to the dry ingredients. Beat on medium speed for about 2 minutes until well combined.
Stir in the boiling water until the batter is smooth. It will be thin, but that’s okay!
Pour the batter evenly into the prepared pans. Bake for 30-35 minutes or until a toothpick comes out clean.
Let the cakes cool in the pans for 10 minutes, then remove from pans and cool completely on wire racks.
For the frosting, beat together peanut butter, softened butter, and vanilla until creamy. Gradually add powdered sugar, mixing until smooth.
Once the cakes are cool, spread frosting between the layers and on top of the cake. Decorate with mini peanut butter cups.
Slice, serve, and enjoy your delicious peanut butter cup cake!
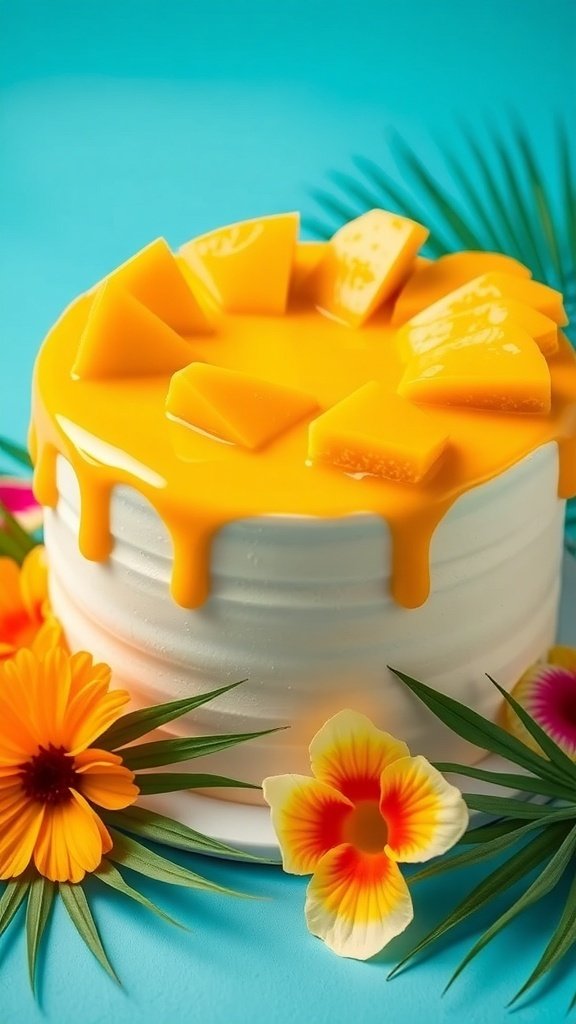
Mango Mousse Cake: A Tropical Touch For The Occasion
Graduation is a big deal, and what better way to celebrate than with a stunning mango mousse cake? This cake is not just a treat for the taste buds but also a feast for the eyes. The bright yellow mango glaze drips down the sides, making it look like a tropical paradise on your dessert table.
Decorated with fresh mango pieces and vibrant flowers, this cake captures the essence of summer. It’s light, airy, and perfect for a warm day. The mousse texture adds a fun twist, making it a delightful choice for any graduation party.
Not only does it taste amazing, but it also brings a cheerful vibe to the celebration. Everyone will love the refreshing mango flavor, and it’s a great way to add a tropical touch to your graduation festivities.
Ingredients
1 cup heavy cream
1 cup mango puree (fresh or canned)
1/2 cup sugar
2 teaspoons gelatin powder
1/4 cup cold water
1 teaspoon vanilla extract
1 cup sponge cake (for the base)
Fresh mango slices for decoration
Edible flowers for decoration
Instructions
Prepare the Gelatin: In a small bowl, sprinkle gelatin over cold water. Let it sit for about 5 minutes until it blooms.
Heat the Gelatin: Gently heat the bloomed gelatin in the microwave for about 10 seconds until it dissolves. Set aside.
Make the Mousse: In a large bowl, whip the heavy cream until soft peaks form. Gradually add sugar and continue whipping until stiff peaks form. Fold in the mango puree and vanilla extract.
Add Gelatin: Slowly fold the dissolved gelatin into the mango mixture until well combined.
Assemble the Cake: Place the sponge cake in a springform pan. Pour the mango mousse over the cake, smoothing the top. Refrigerate for at least 4 hours or until set.
Decorate: Once set, carefully remove the cake from the pan. Top with fresh mango slices and edible flowers for a beautiful finish.
Serve and Enjoy: Slice and serve this delightful mango mousse cake at your graduation celebration!
A birthday celebration isn’t complete without a show-stopping happy birthday cake at its center. Whether you’re planning an intimate gathering or a grand party, the cake serves as both a delicious treat and a meaningful symbol of celebration. This visual guide explores the most inspiring birthday cake trends, creative decorating techniques, and presentation ideas to…
Summer salads are a fresh and vibrant way to enjoy the seasonal bounty of fruits and vegetables. With a mix of textures and flavors, these recipes are easy to whip up and perfect for warm days. Whether you’re looking for a light lunch or a side dish for your next barbecue, these salads bring a…
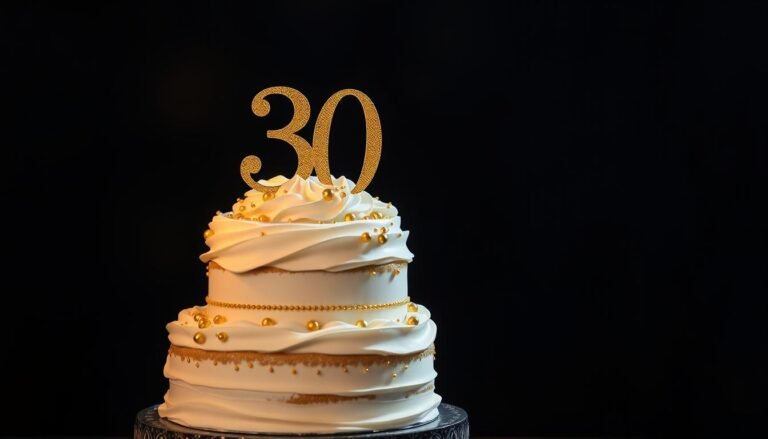
Turning 30 is a significant milestone that deserves a cake as special as the occasion. Whether you’re planning your own celebration or organizing a party for someone else, the perfect 30th birthday cake can be the centerpiece that ties everything together. From elegant tiered designs to playful “Dirty Thirty” themes, we’ll explore creative ideas, popular…
Ranch pasta salad is the ultimate crowd-pleaser that combines the creamy, tangy flavor of ranch dressing with tender pasta and crisp vegetables. Whether you’re planning a summer barbecue, need a potluck dish that won’t disappoint, or simply want to meal prep for the week ahead, these ranch pasta salad recipes are versatile, easy to make,…
Summer dips and appetizers bring a burst of flavor to any gathering, whether it’s a backyard barbecue or a simple picnic. They’re perfect for sharing and keep things light and refreshing during those sunny days. From zesty salsas to creamy spreads, these bite-sized delights make entertaining effortless and tasty! This Website contains affiliate links. That…
Nearly 7 in 10 U.S. households say home-cooked meals boost connection at the end of a busy day. This Website contains affiliate links. That means I may earn a small commission if you purchase through my links, at no extra cost to you. Keeping evening meals calm starts with a short list of go-to recipes…