Graduation parties are a reason to celebrate, and what better way to sweeten the occasion than with a variety of delicious desserts? From fun cupcakes to trendy cookie bars, these treats can add a playful touch to your festivities and cater to every taste. Get ready to impress your guests with some creative and delightful options!
This Website contains affiliate links. That means I may earn a small commission if you purchase through my links, at no extra cost to you.
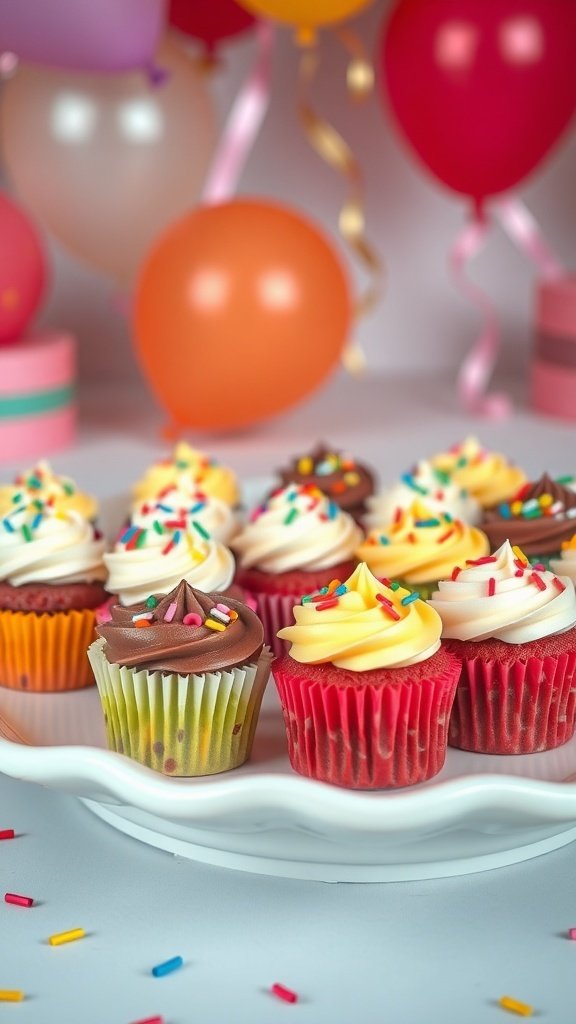
Delightful Mini Cupcakes For Every Celebration
Mini cupcakes are the perfect treat for any celebration, especially a graduation party! These little bites of joy come in a variety of flavors and colors, making them a hit among guests of all ages. The image shows a delightful assortment of mini cupcakes topped with swirls of frosting and colorful sprinkles. The vibrant colors and festive decorations create a cheerful atmosphere, ideal for marking special occasions.
These mini cupcakes are not just cute; they are also incredibly versatile. You can choose classic flavors like vanilla and chocolate or get creative with fun options like red velvet or lemon. Pair them with different frosting styles, and you have a dessert that can please any crowd.
To make your graduation party even sweeter, here’s a simple recipe for mini cupcakes that everyone will love!
Ingredients
1 1/2 cups all-purpose flour
1 cup granulated sugar
1/2 cup unsalted butter, softened
2 large eggs
1/2 cup milk
1 1/2 teaspoons baking powder
1 teaspoon vanilla extract
1/4 teaspoon salt
Frosting of your choice
Sprinkles for decoration
Instructions
Preheat your oven to 350°F (175°C) and line a mini cupcake pan with liners.
In a large bowl, cream together the softened butter and sugar until light and fluffy.
Add the eggs one at a time, mixing well after each addition. Stir in the vanilla extract.
In another bowl, whisk together the flour, baking powder, and salt.
Gradually add the dry ingredients to the wet mixture, alternating with the milk. Mix until just combined.
Fill each mini cupcake liner about two-thirds full with batter.
Bake for 12-15 minutes or until a toothpick inserted in the center comes out clean.
Let the cupcakes cool completely before frosting them with your favorite icing.
Top with sprinkles for that festive touch!
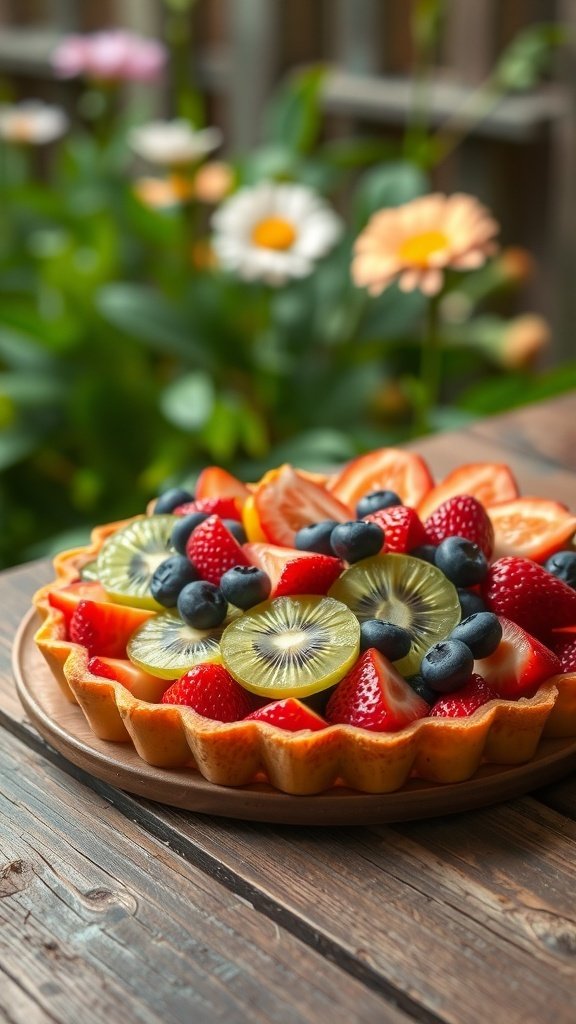
Refreshing Fruit Tart With A Twist
Fruit tarts are a delightful way to celebrate any occasion, especially a graduation party. This refreshing fruit tart is not just a feast for the eyes; it’s packed with flavor and a hint of surprise. The tart features a crisp, buttery crust filled with creamy custard and topped with an array of vibrant fruits. Strawberries, blueberries, kiwi, and orange slices create a colorful display that’s sure to impress your guests.
The twist comes from a splash of citrus zest in the custard, giving it a zesty kick that complements the sweetness of the fruits. This tart is perfect for warm weather, providing a light and refreshing dessert option that everyone will love.
Ingredients
1 pre-made tart shell (9-inch)
1 cup heavy cream
1/2 cup granulated sugar
2 large egg yolks
2 tablespoons cornstarch
1 teaspoon vanilla extract
Zest of 1 lemon
1 cup strawberries, sliced
1 cup blueberries
1 cup kiwi, sliced
1 orange, segmented
1/4 cup apricot jam (for glaze)
Instructions
Prepare the Custard: In a saucepan, whisk together the heavy cream, sugar, egg yolks, cornstarch, vanilla extract, and lemon zest. Cook over medium heat, stirring constantly until the mixture thickens and bubbles.
Cool the Custard: Remove from heat and let it cool slightly. Pour the custard into the tart shell, spreading it evenly.
Arrange the Fruits: Once the custard has set, artfully arrange the sliced strawberries, blueberries, kiwi, and orange segments on top of the custard.
Glaze the Tart: In a small saucepan, heat the apricot jam until it becomes liquid. Brush it over the fruits to give them a shiny finish.
Chill and Serve: Refrigerate the tart for at least 2 hours before serving. Slice and enjoy the refreshing flavors!
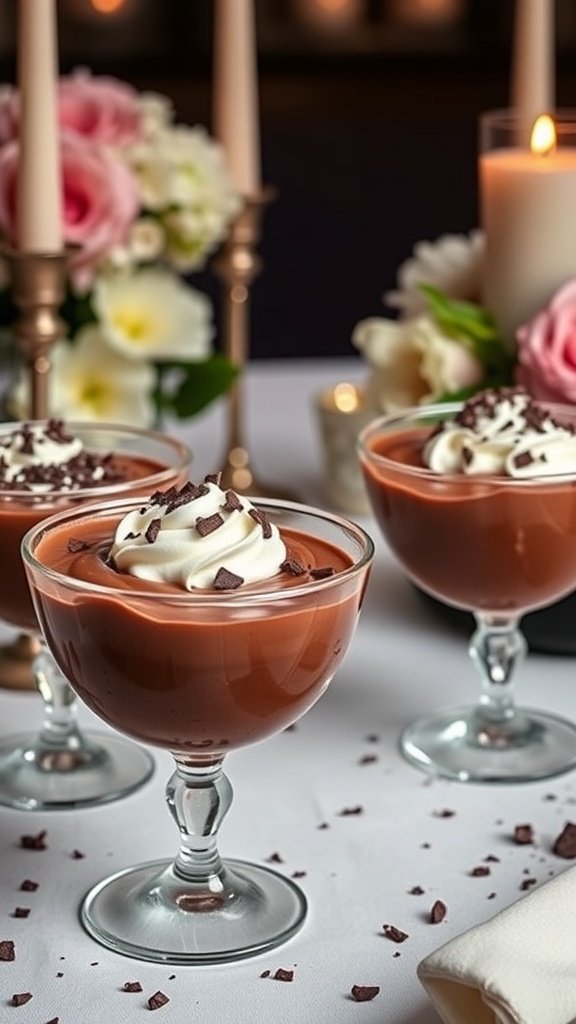
Decadent Chocolate Mousse To Impress Your Guests
Chocolate mousse is a classic dessert that never fails to impress. Its rich, creamy texture and deep chocolate flavor make it a favorite at any celebration. For a graduation party, this dessert can be the highlight of your spread. Picture these elegant cups filled with velvety mousse, topped with a swirl of whipped cream and chocolate shavings. They look stunning on the table and taste even better!
To make your chocolate mousse, you’ll need a few simple ingredients. The key is to use high-quality chocolate for the best flavor. This dessert is not only easy to prepare but also allows you to get creative with toppings. Fresh berries, mint leaves, or even a sprinkle of sea salt can elevate the experience.
Ingredients
8 ounces dark chocolate, chopped
2 tablespoons unsalted butter
3 large eggs, separated
1/4 cup granulated sugar
1 cup heavy cream
1 teaspoon vanilla extract
Whipped cream and chocolate shavings for topping
Instructions
Melt the chocolate and butter together in a heatproof bowl over simmering water. Stir until smooth, then remove from heat and let cool slightly.
In a separate bowl, whisk the egg yolks and sugar until pale and creamy. Gradually add the melted chocolate mixture, stirring until well combined.
In another bowl, beat the heavy cream and vanilla extract until soft peaks form. Gently fold the whipped cream into the chocolate mixture.
In a clean bowl, whisk the egg whites until stiff peaks form. Carefully fold the egg whites into the chocolate mixture until no white streaks remain.
Divide the mousse into serving cups and refrigerate for at least 2 hours, or until set. Before serving, top with whipped cream and chocolate shavings.
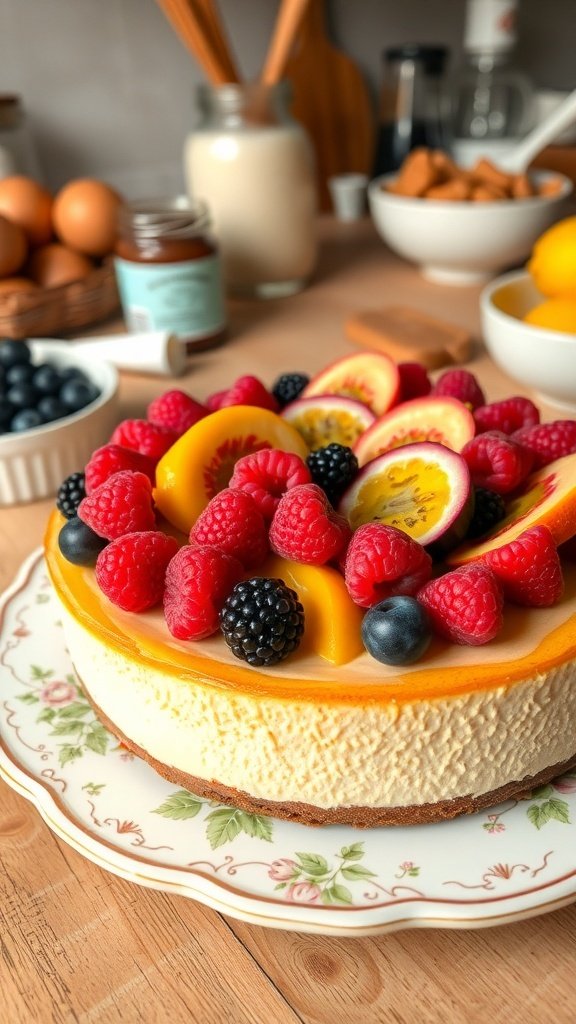
Classic Cheesecake With Seasonal Fruit Topping
Classic cheesecake is a timeless dessert that never fails to impress. Its creamy texture and rich flavor make it a favorite at any gathering. Topped with seasonal fruits, it becomes even more delightful. The vibrant colors of the fruits not only enhance the look but also add a refreshing taste that balances the richness of the cheesecake.
Imagine a smooth cheesecake sitting on a lovely plate, adorned with fresh raspberries, blueberries, and slices of juicy peaches. The combination of flavors is simply irresistible. This dessert is perfect for a graduation party, where guests can indulge in a slice while celebrating achievements.
Making this cheesecake is straightforward. You’ll need some basic ingredients, and the steps are easy to follow. Let’s get started!
Ingredients
1 ½ cups graham cracker crumbs
½ cup unsalted butter, melted
2 cups cream cheese, softened
1 cup granulated sugar
3 large eggs
1 teaspoon vanilla extract
1 cup sour cream
Fresh seasonal fruits (like raspberries, blueberries, and peaches) for topping
Instructions
Preheat your oven to 325°F (160°C).
In a bowl, mix the graham cracker crumbs and melted butter. Press this mixture into the bottom of a 9-inch springform pan to form the crust.
In another bowl, beat the cream cheese and sugar until smooth. Add the eggs one at a time, mixing well after each addition. Stir in the vanilla extract and sour cream until combined.
Pour the cream cheese mixture over the crust in the springform pan. Bake for about 50-60 minutes, or until the center is set but slightly jiggly.
Turn off the oven and let the cheesecake cool inside for an hour. Then, remove it and refrigerate for at least 4 hours, or overnight for best results.
Before serving, top the cheesecake with fresh seasonal fruits. Slice and enjoy!
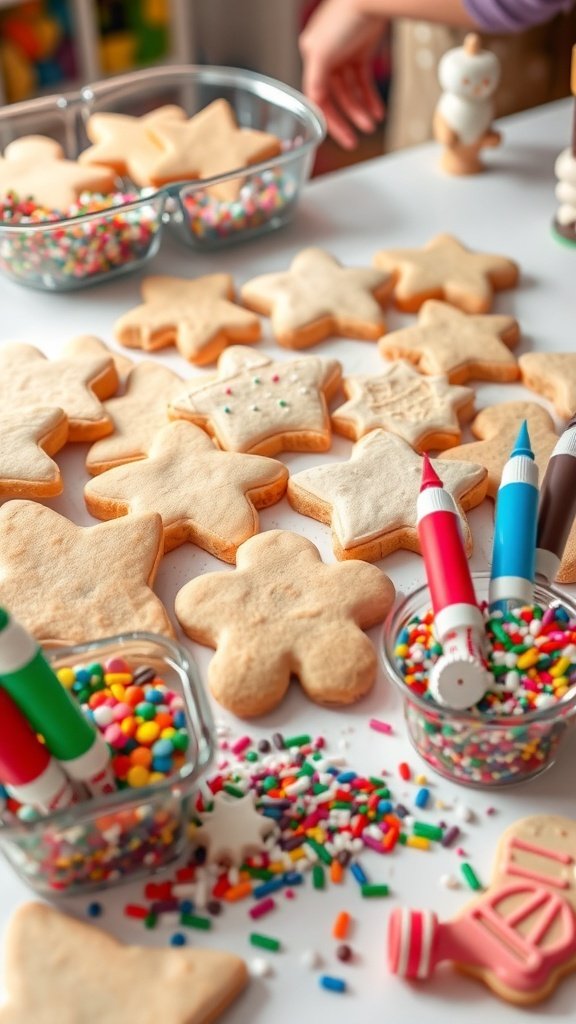
Fun And Easy Cookie Decorating Station
Setting up a cookie decorating station is a fantastic way to add fun to your grad party. Imagine a table filled with freshly baked cookies in various shapes, just waiting to be transformed into colorful creations. This setup invites everyone to get creative and express themselves through their cookie designs.
In the image, you can see a delightful array of star-shaped cookies, ready for decoration. There are bowls filled with vibrant sprinkles and colorful icing tubes, making it easy for guests to personalize their treats. This hands-on activity not only entertains but also gives everyone a tasty reward at the end.
To make your cookie decorating station a hit, consider providing a variety of toppings. Think sprinkles, edible glitter, and even small candies. This way, everyone can create something unique. Plus, it’s a great way to spark conversations and laughter as guests share their cookie masterpieces.
Ingredients
2 3/4 cups all-purpose flour
1 teaspoon baking soda
1/2 teaspoon baking powder
1 cup unsalted butter, softened
1 1/2 cups white sugar
1 egg
1 teaspoon vanilla extract
1/2 teaspoon almond extract
3 to 4 cups powdered sugar
2 tablespoons milk
Food coloring (optional)
Sprinkles and other decorations
Instructions
Preheat your oven to 375°F (190°C). In a small bowl, stir together flour, baking soda, and baking powder. Set aside.
In a large bowl, cream together the butter and sugar until smooth. Beat in the egg, vanilla extract, and almond extract.
Gradually blend in the dry ingredients. Roll rounded teaspoonfuls of dough into balls, and place onto ungreased cookie sheets. Flatten each ball slightly with the bottom of a glass.
Bake 8 to 10 minutes in the preheated oven, or until golden. Let cool on wire racks.
For the icing, mix powdered sugar and milk until smooth. Divide into bowls and add food coloring if desired. Use the icing to decorate your cookies, then add sprinkles and other toppings.
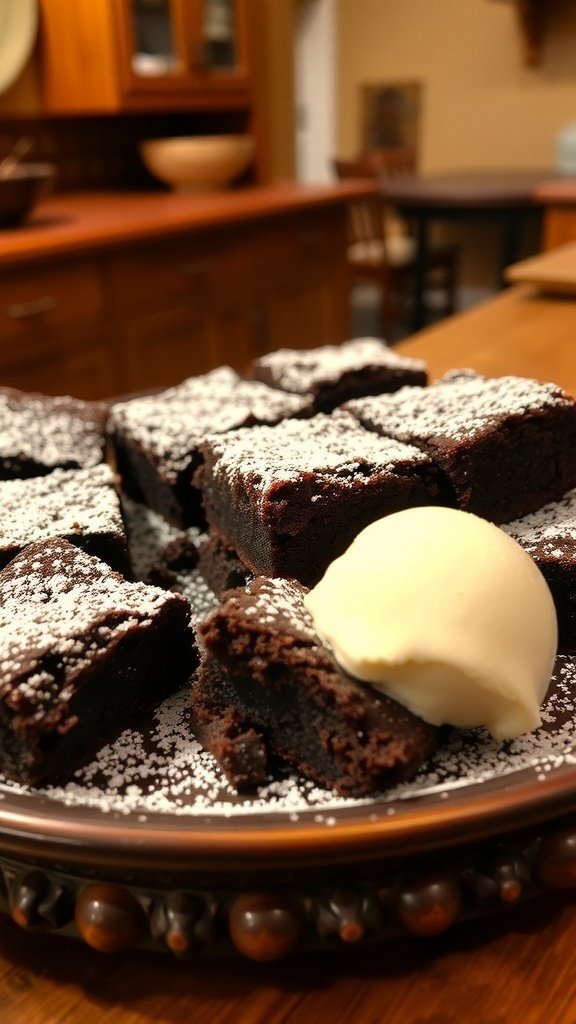
Irresistible Brownies With A Fudgy Center
Brownies are a classic dessert that everyone loves, especially at a graduation party. These brownies are rich, fudgy, and topped with a light dusting of powdered sugar. The gooey center is what makes them truly irresistible. They are perfect for celebrating achievements and sharing with friends and family.
Imagine serving these warm brownies with a scoop of vanilla ice cream on the side. The combination of warm chocolate and cold ice cream is simply delightful. These treats are not just desserts; they are a celebration of hard work and success.
Ingredients
1 cup unsalted butter
2 cups granulated sugar
4 large eggs
1 teaspoon vanilla extract
1 cup all-purpose flour
1 cup unsweetened cocoa powder
1/2 teaspoon salt
1/2 teaspoon baking powder
Powdered sugar for dusting
Instructions
Preheat the oven to 350°F (175°C). Grease a 9×13 inch baking pan.
In a saucepan, melt the butter over low heat. Remove from heat and stir in sugar, eggs, and vanilla.
In a separate bowl, mix together flour, cocoa powder, salt, and baking powder. Gradually add to the butter mixture, stirring until well combined.
Pour the batter into the prepared baking pan and spread evenly.
Bake for 20-25 minutes, or until a toothpick inserted comes out with a few moist crumbs.
Let cool before cutting into squares. Dust with powdered sugar before serving.
Vibrant Rainbow Jello Cups For A Fun Twist
Rainbow Jello cups are a delightful treat that adds a splash of color to any graduation party. These layered cups are not only visually appealing but also incredibly easy to make. Each layer brings a different flavor, making them a hit among guests of all ages.
The bright colors of the jello create a festive atmosphere, perfect for celebrating achievements. Stack them high for an impressive display, and watch as everyone reaches for their favorite flavor. These cups are a fun way to enjoy dessert while keeping the party lively!
Ingredients
1 box of red jello
1 box of orange jello
1 box of yellow jello
1 box of green jello
1 box of blue jello
1 box of purple jello
4 cups boiling water
4 cups cold water
2 cups whipped cream (optional, for topping)
Instructions
Prepare the Jello: In separate bowls, dissolve each jello flavor in 1 cup of boiling water. Stir until fully dissolved.
Add Cold Water: Mix in 1 cup of cold water to each bowl and stir well.
Layer the Jello: Start with the red jello. Pour a layer into clear cups and refrigerate for about 30 minutes until set. Repeat this process with each color, allowing each layer to set before adding the next.
Top with Whipped Cream: Once all layers are set, add a dollop of whipped cream on top for a creamy finish.
Serve and Enjoy: Display your colorful jello cups on a table and watch them disappear!
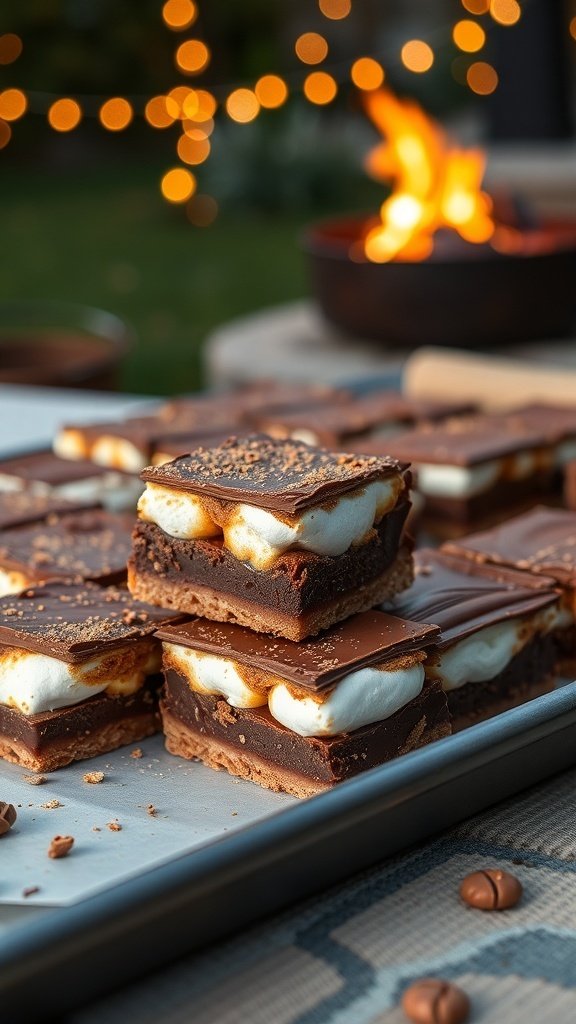
Delicious S’Mores Bars For A Campfire Feel
Nothing says celebration like a sweet treat, and these S’mores bars bring that campfire vibe right to your grad party. Imagine the gooey marshmallows, rich chocolate, and crunchy graham crackers all layered together. These bars are perfect for outdoor gatherings, especially with a cozy fire in the background.
The image showcases beautifully stacked S’mores bars, with their layers of chocolate and marshmallow peeking out. The warm glow of string lights and the flickering fire add to the inviting atmosphere, making these bars even more tempting. They’re easy to grab and enjoy, allowing guests to mingle while savoring this delightful dessert.
These S’mores bars are not just tasty; they’re also simple to make. You can whip them up ahead of time, leaving you free to enjoy the party. Plus, they’re a hit with both kids and adults alike!
Ingredients
1 cup graham cracker crumbs
1/2 cup unsalted butter, melted
1/4 cup granulated sugar
2 cups chocolate chips (milk or dark)
2 cups mini marshmallows
1/4 cup crushed graham crackers for topping
Instructions
Preheat your oven to 350°F (175°C). Grease a 9×9 inch baking dish.
In a bowl, combine graham cracker crumbs, melted butter, and sugar. Mix until well combined.
Press the mixture firmly into the bottom of the prepared baking dish to form the crust.
Layer the chocolate chips evenly over the crust.
Add the mini marshmallows on top of the chocolate layer.
Bake for about 15 minutes, or until the marshmallows are golden brown.
Remove from the oven and sprinkle crushed graham crackers on top.
Let the bars cool before cutting into squares and serving.
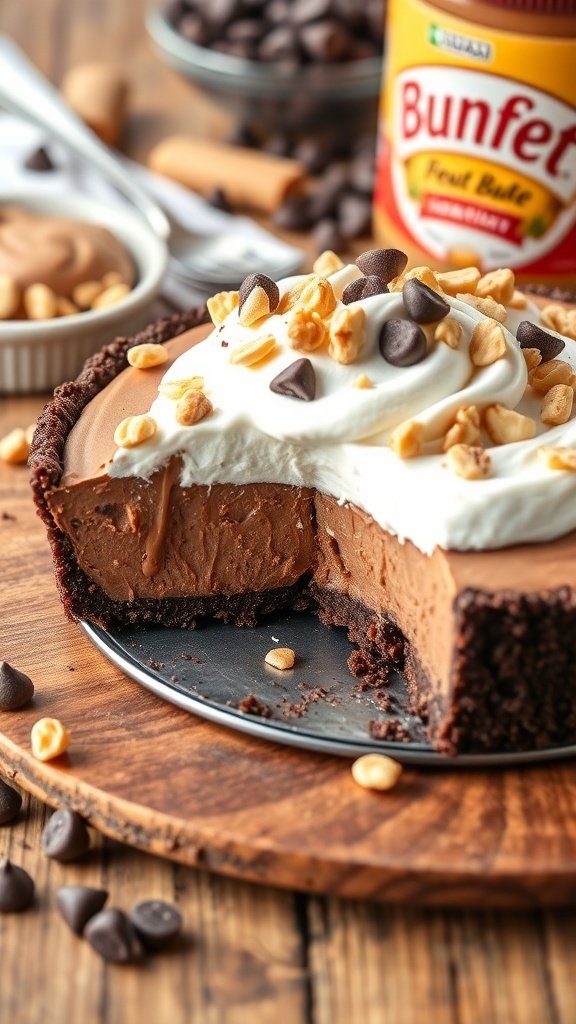
Easy No-Bake Chocolate Peanut Butter Pie
This Easy No-Bake Chocolate Peanut Butter Pie is a perfect treat for any grad party. It’s rich, creamy, and packed with flavor. The combination of chocolate and peanut butter is always a crowd-pleaser. Plus, it’s super simple to make, which means you can spend more time celebrating and less time in the kitchen.
The pie features a delicious chocolate crust, filled with a smooth peanut butter filling. Topped with whipped cream and a sprinkle of chocolate chips and peanuts, it looks as good as it tastes. Your guests will love this dessert, and it’s sure to be the highlight of the party!
Here’s how to whip up this delightful pie:
Ingredients
1 pre-made chocolate cookie crust
1 cup creamy peanut butter
1 cup powdered sugar
1 cup heavy whipping cream
1 teaspoon vanilla extract
1 cup chocolate chips (for topping)
1/2 cup chopped peanuts (for topping)
Instructions
In a mixing bowl, combine peanut butter and powdered sugar. Mix until smooth and creamy.
In another bowl, whip the heavy cream and vanilla extract until stiff peaks form.
Gently fold the whipped cream into the peanut butter mixture until well combined.
Pour the filling into the chocolate cookie crust and smooth the top.
Chill in the refrigerator for at least 4 hours, or until set.
Before serving, top with whipped cream, chocolate chips, and chopped peanuts.
Light And Fluffy Pavlova With Whipped Cream
Pavlova is a stunning dessert that brings a light and airy touch to any celebration, especially a graduation party. This delightful treat features a crisp outer shell and a soft, marshmallow-like center. Topped with fluffy whipped cream and fresh berries, it’s a showstopper on any dessert table.
The image showcases a beautifully crafted pavlova, crowned with luscious strawberries and blueberries. The vibrant colors of the fruit pop against the white cream, making it not just delicious but also visually appealing. This dessert is perfect for warm weather, providing a refreshing end to a festive meal.
Making pavlova is easier than it looks! With just a few simple ingredients, you can create a dessert that impresses everyone. Let’s get into the recipe!
Ingredients
4 large egg whites
1 cup granulated sugar
1 teaspoon vanilla extract
1 teaspoon white vinegar
2 cups heavy whipping cream
2 tablespoons powdered sugar
1 teaspoon vanilla extract (for cream)
Fresh strawberries, halved
Fresh blueberries
Instructions
Preheat the oven to 275°F (135°C). Line a baking sheet with parchment paper and draw a circle (about 8 inches) on it as a guide.
In a clean bowl, beat the egg whites until soft peaks form. Gradually add granulated sugar, one tablespoon at a time, and continue beating until stiff peaks form and the mixture is glossy.
Gently fold in the vanilla extract and white vinegar. Spoon the meringue onto the prepared circle, smoothing the top and creating a slight well in the center.
Bake for 1 hour, then turn off the oven and let the pavlova cool completely inside.
Once cooled, whip the heavy cream with powdered sugar and vanilla extract until soft peaks form.
Carefully transfer the pavlova to a serving plate. Fill the center with whipped cream and top with fresh strawberries and blueberries.
Slice and serve immediately, enjoying the light and fluffy goodness!
Turning 30 is a milestone worth celebrating in style! Whether you’re planning your own bash or organizing a surprise for someone special, this collection of creative 30th birthday party ideas will help you design an unforgettable celebration. From elegant soirées to adventurous outings, we’ve gathered inspiration that’s perfect for pinning and bringing to life. Each…
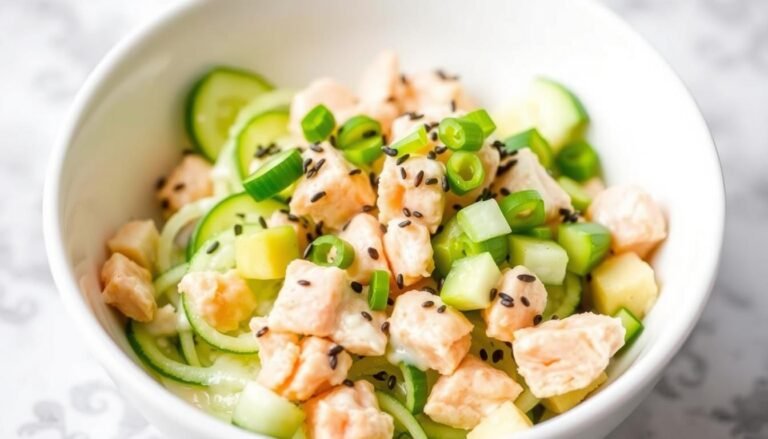
Craving the flavors of sushi without the fuss of rolling? This California Roll Cucumber Salad transforms the beloved California roll into a refreshing, deconstructed bowl that’s perfect for warm days. Crisp cucumber slices replace rice as the base, while imitation crab, creamy avocado, and a tangy Asian-inspired dressing create that unmistakable sushi experience. Ready in…
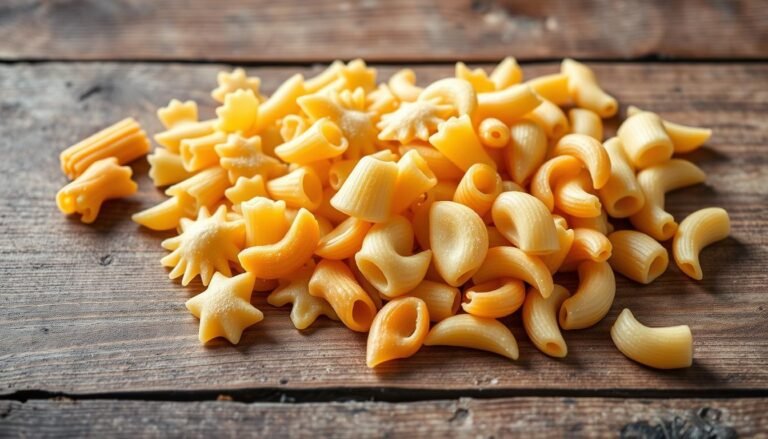
Pasta salad is the ultimate crowd-pleaser that combines convenience with endless flavor possibilities. Whether you’re planning a summer picnic, need a side dish for a potluck, or simply want to meal prep for the week ahead, these easy pasta salad recipes will become your go-to solutions. The beauty of pasta salad lies in its versatility—you…
Step into the delightful world of the strawberry shortcake house, where nostalgia meets creativity! Whether you’re a collector of the vintage Berry Happy Home dollhouse, a DIY enthusiast looking to create strawberry-themed spaces, or a baker seeking inspiration for sweet treats, this berry special journey has something for everyone. Join us as we explore the…
There’s something magical about receiving a handmade birthday card decorated with personal doodles. Unlike store-bought cards that get tossed away, these heartfelt creations become treasured keepsakes that capture a moment of connection. The good news? You don’t need to be an artist to create charming happy birthday doodles that will delight your friends and family….
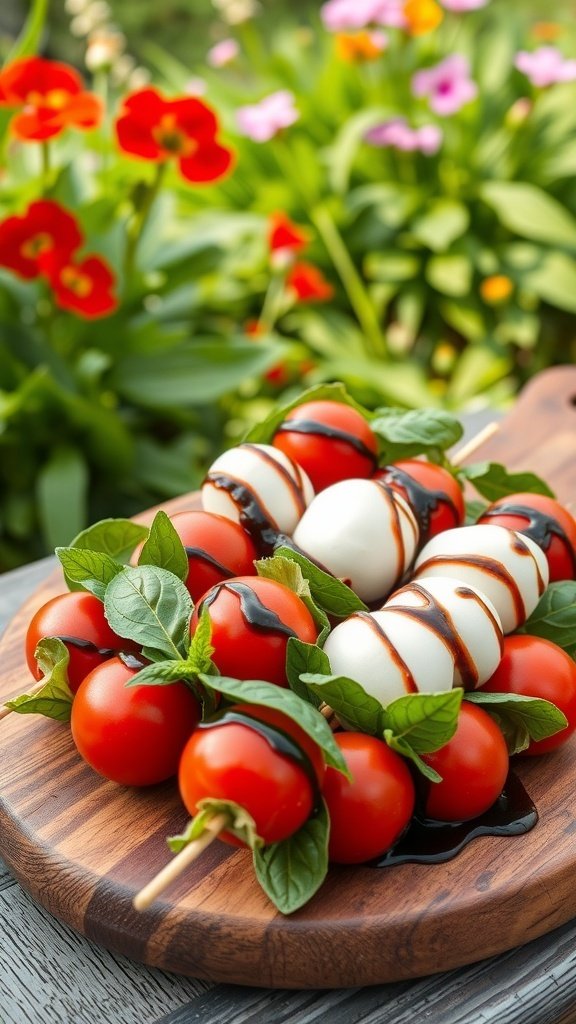
Summer appetizers bring a refreshing twist to your gatherings, perfect for outdoor parties or cozy get-togethers. These light and tasty bites are designed to complement the warmth of the season, featuring seasonal ingredients that burst with flavor. From fruity skewers to savory dips, there’s something to please every palate and make your summer nights a…