Delicious Summer Baking Recipes to Try This Season
Summer baking brings a refreshing twist to your kitchen, combining seasonal flavors with fun, light desserts that are perfect for warm days. From fruity pies to no-bake treats, it’s all about enjoying the sweet side of summer while creating delicious memories with family and friends. Grab your apron, and let’s whip up some sunshine in the form of vibrant baked goodies!
This Website contains affiliate links. That means I may earn a small commission if you purchase through my links, at no extra cost to you.
Delightful Berry Galette To Celebrate Summer’S Bounty

Summer is the perfect time to enjoy fresh berries, and what better way to celebrate than with a delightful berry galette? This rustic dessert showcases the vibrant colors and flavors of seasonal fruits. The golden, flaky crust cradles a medley of juicy berries, making each bite a burst of summer goodness.
The beauty of a galette lies in its simplicity. You don’t need to worry about perfecting a pie crust. Just roll out the dough, pile on the berries, and fold the edges over. It’s casual and inviting, just like summer itself!
Using a mix of strawberries, blueberries, raspberries, and blackberries adds a lovely variety of flavors and textures. The sweetness of the strawberries pairs beautifully with the tartness of the blueberries and raspberries. A sprinkle of sugar enhances the natural sweetness, while a hint of lemon juice brightens the flavors.
This berry galette is not just a treat for the taste buds; it’s also a feast for the eyes. The colorful berries against the golden crust create a stunning centerpiece for any summer gathering. Serve it warm with a scoop of vanilla ice cream or a dollop of whipped cream for an extra touch of indulgence.
Ready to make your own? Here’s how!
Ingredients
- 1 1/4 cups all-purpose flour
- 1/4 teaspoon salt
- 1/4 cup granulated sugar (plus more for sprinkling)
- 1/2 cup unsalted butter, chilled and cubed
- 3-4 tablespoons ice water
- 1 cup strawberries, hulled and sliced
- 1 cup blueberries
- 1 cup raspberries
- 1 cup blackberries
- 1 tablespoon lemon juice
Instructions
- Make the Dough: In a bowl, mix flour, salt, and sugar. Add the cubed butter and mix until it resembles coarse crumbs. Stir in ice water, one tablespoon at a time, until the dough comes together. Shape into a disk, wrap in plastic, and refrigerate for at least 30 minutes.
- Prepare the Filling: In another bowl, combine the berries, lemon juice, and a sprinkle of sugar. Let it sit for about 10 minutes to allow the juices to develop.
- Preheat the Oven: Preheat your oven to 375°F (190°C).
- Roll Out the Dough: On a floured surface, roll out the dough into a circle about 12 inches in diameter. Transfer it to a baking sheet lined with parchment paper.
- Assemble the Galette: Spoon the berry mixture into the center of the dough, leaving a 2-inch border. Fold the edges over the berries, pleating as you go.
- Bake: Sprinkle the crust with sugar and bake for 35-40 minutes, or until the crust is golden brown and the berries are bubbly.
- Cool and Serve: Let the galette cool for a few minutes before slicing. Enjoy it warm or at room temperature, with ice cream or whipped cream if desired.
Refreshing Lemon Blueberry Muffins For A Bright Morning
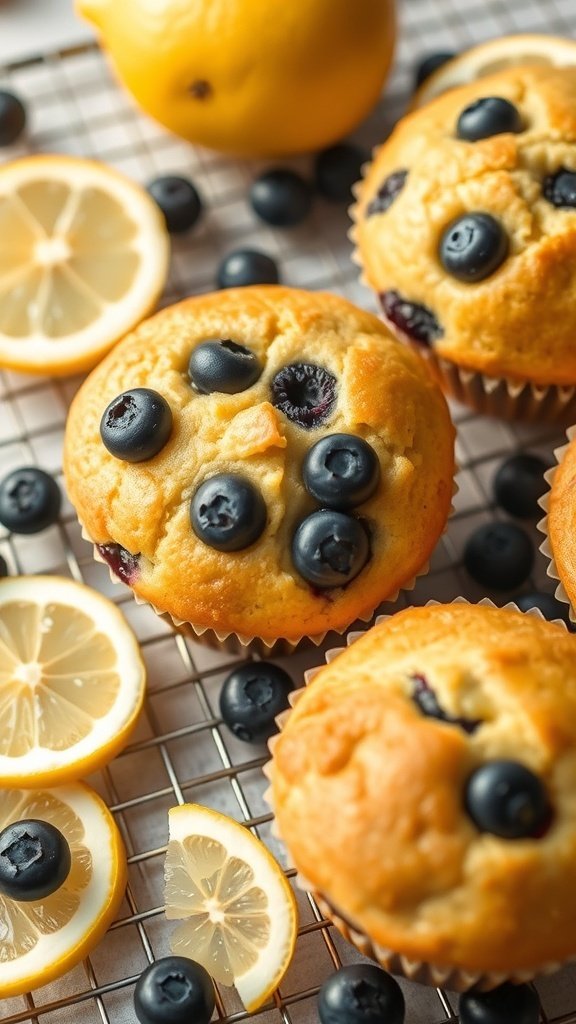
Summer mornings are perfect for a light and refreshing treat. These lemon blueberry muffins bring a burst of flavor that’s just right for the season. The bright yellow of the lemons and the deep blue of the blueberries create a cheerful look that’s hard to resist. Imagine starting your day with these delightful muffins, paired with a cup of coffee or tea.
The combination of zesty lemon and sweet blueberries makes each bite a joyful experience. These muffins are fluffy and moist, making them a great choice for breakfast or a snack. Plus, they are easy to whip up, so you can enjoy them fresh out of the oven in no time.
Let’s gather the ingredients and get baking!
Ingredients
- 1 1/2 cups all-purpose flour
- 1/2 cup granulated sugar
- 2 teaspoons baking powder
- 1/2 teaspoon baking soda
- 1/4 teaspoon salt
- 1/2 cup unsalted butter, melted
- 2 large eggs
- 1/2 cup buttermilk
- 1 tablespoon lemon zest
- 1/4 cup fresh lemon juice
- 1 cup fresh blueberries
Instructions
- Preheat the oven to 350°F (175°C) and line a muffin tin with paper liners.
- In a large bowl, whisk together the flour, sugar, baking powder, baking soda, and salt.
- In another bowl, mix the melted butter, eggs, buttermilk, lemon zest, and lemon juice until well combined.
- Pour the wet ingredients into the dry ingredients and stir gently until just combined. Be careful not to overmix.
- Fold in the fresh blueberries.
- Divide the batter evenly among the muffin cups, filling each about 2/3 full.
- Bake for 18-20 minutes, or until a toothpick inserted in the center comes out clean.
- Let the muffins cool in the pan for a few minutes before transferring them to a wire rack to cool completely.
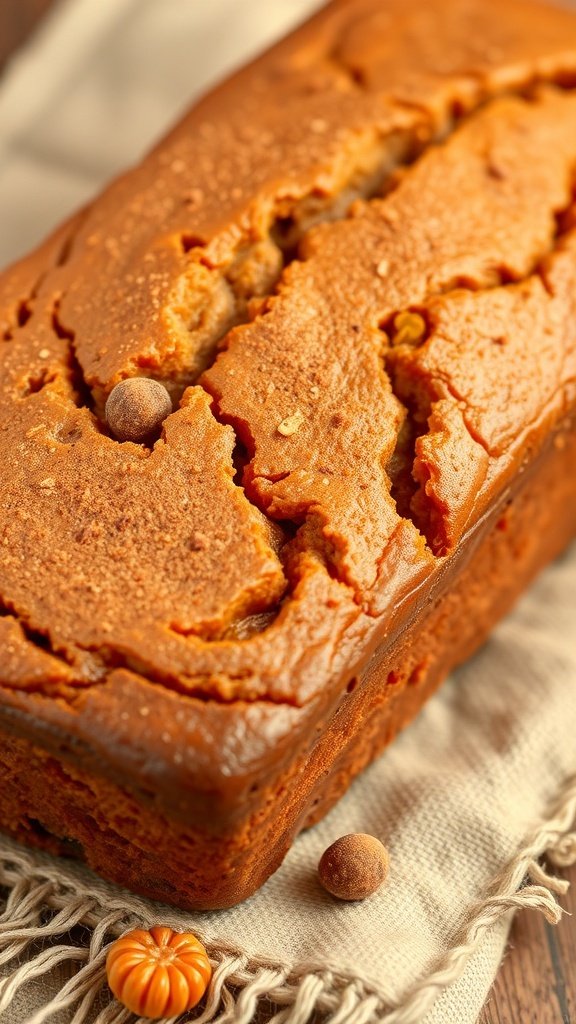
Decadent Chocolate Zucchini Bread For A Summer Treat

Summer is the perfect time to enjoy baking, especially with fresh ingredients from the garden. One delightful option is chocolate zucchini bread. It’s a fantastic way to use up those extra zucchinis while indulging in a rich, chocolatey treat.
This bread is moist and flavorful, thanks to the grated zucchini mixed into the batter. The chocolate chips on top add a sweet touch that makes it hard to resist. Whether you enjoy it for breakfast, as a snack, or dessert, this bread is sure to please everyone.
Let’s get into the details of making this delicious chocolate zucchini bread. You’ll find it’s simple and fun, perfect for a summer baking day!
Ingredients
- 1 ½ cups all-purpose flour
- 1 cup granulated sugar
- ½ cup unsweetened cocoa powder
- 1 teaspoon baking soda
- ½ teaspoon baking powder
- ½ teaspoon salt
- 2 large eggs
- 1 cup vegetable oil
- 2 cups grated zucchini (about 2 medium zucchinis)
- 1 teaspoon vanilla extract
- 1 cup chocolate chips (plus extra for topping)
Instructions
- Preheat the oven to 350°F (175°C). Grease a 9×5-inch loaf pan.
- In a large bowl, whisk together flour, sugar, cocoa powder, baking soda, baking powder, and salt.
- In another bowl, beat the eggs and then mix in the oil, grated zucchini, and vanilla extract.
- Combine the wet and dry ingredients, stirring until just mixed. Fold in the chocolate chips.
- Pour the batter into the prepared loaf pan. Sprinkle extra chocolate chips on top.
- Bake for 50-60 minutes, or until a toothpick inserted in the center comes out clean.
- Let it cool in the pan for 10 minutes, then transfer to a wire rack to cool completely before slicing.
Classic Peach Cobbler To Savor The Summer Flavors
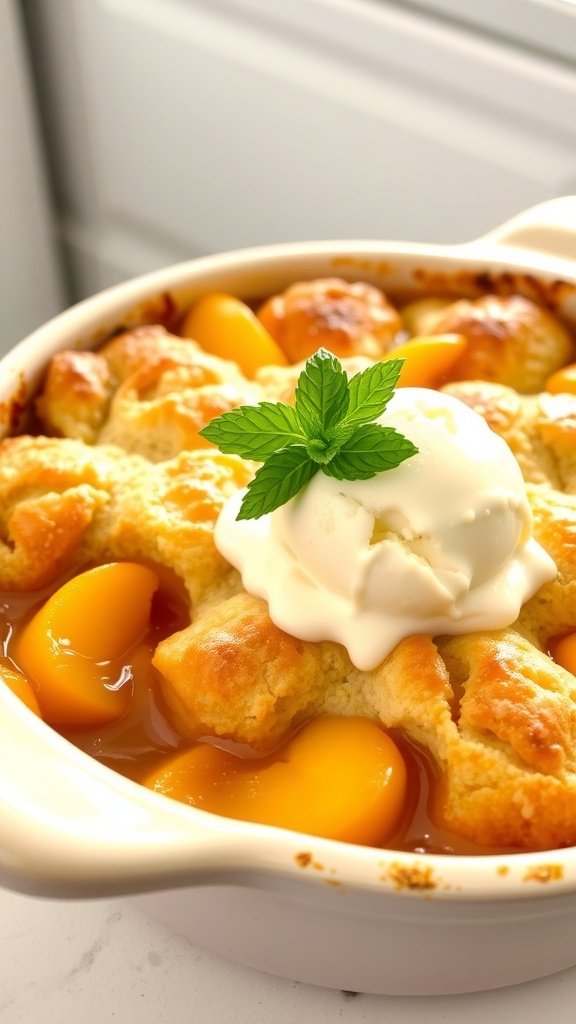
Summer is the perfect time to enjoy fresh, juicy peaches. One of the best ways to celebrate this seasonal fruit is with a classic peach cobbler. This dessert is warm, comforting, and bursting with flavor. The golden crust pairs beautifully with sweet, tender peaches, making it a delightful treat for any summer gathering.
The image showcases a beautifully baked peach cobbler, topped with a scoop of creamy vanilla ice cream and a sprig of fresh mint. The cobbler’s golden-brown crust looks inviting, while the juicy peaches peek through, promising a sweet and satisfying bite. This dish is not just a feast for the taste buds but also for the eyes!
Making peach cobbler is simple and rewarding. You can use fresh peaches when they are in season or canned peaches for convenience. Either way, the result is a dessert that everyone will love. Serve it warm, and don’t forget the ice cream!
Ingredients
- 4 cups fresh peaches, sliced (or 2 cans of sliced peaches)
- 1 cup granulated sugar
- 1 teaspoon cinnamon
- 1 tablespoon lemon juice
- 1 cup all-purpose flour
- 1 cup milk
- 1/2 cup unsalted butter, melted
- 2 teaspoons baking powder
- 1/2 teaspoon salt
Instructions
- Preheat your oven to 350°F (175°C).
- In a bowl, mix the sliced peaches, 1/2 cup of sugar, cinnamon, and lemon juice. Pour this mixture into a greased baking dish.
- In another bowl, combine flour, remaining sugar, baking powder, and salt. Stir in the milk and melted butter until smooth.
- Pour the batter over the peach mixture in the baking dish. Do not stir; the batter will rise during baking.
- Bake for 35-40 minutes, or until the top is golden brown and a toothpick comes out clean.
- Let it cool slightly before serving. Enjoy warm with a scoop of vanilla ice cream!
Tropical Coconut Pineapple Cake For A Slice Of Paradise
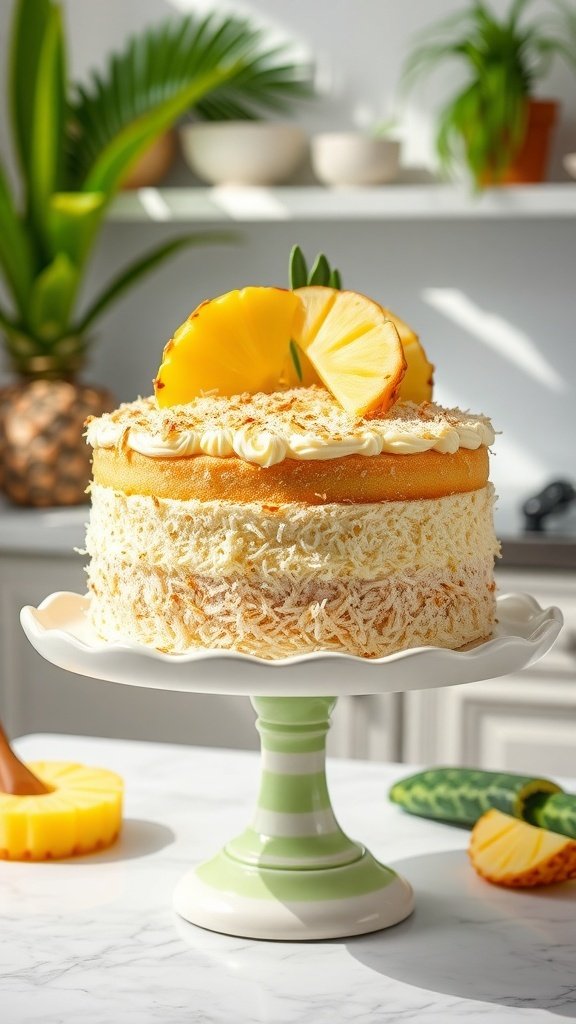
Picture this: a stunning cake that brings a taste of the tropics right to your kitchen. The Tropical Coconut Pineapple Cake is not just a dessert; it’s a slice of paradise. With its fluffy layers and creamy frosting, this cake is perfect for summer gatherings or just a sweet treat on a sunny afternoon.
The cake features a delightful combination of coconut and pineapple, creating a refreshing flavor that dances on your taste buds. Topped with toasted coconut and fresh pineapple slices, it’s as beautiful as it is delicious. The vibrant colors and textures make it a showstopper at any gathering.
Making this cake is a breeze, and the ingredients are simple. You’ll need flour, sugar, eggs, coconut milk, crushed pineapple, and a few other staples. The steps are straightforward, making it an ideal recipe for bakers of all skill levels. So, let’s get started on this tropical delight!
Ingredients
- 2 cups all-purpose flour
- 1 ½ cups granulated sugar
- 1 cup coconut milk
- 1 cup crushed pineapple, drained
- 4 large eggs
- 1 cup unsweetened shredded coconut
- 1 tablespoon baking powder
- ½ teaspoon salt
- 1 cup unsalted butter, softened
- 1 teaspoon vanilla extract
- 1 cup heavy cream (for frosting)
- 2 cups powdered sugar (for frosting)
- Toasted coconut and pineapple slices for decoration
Instructions
- Preheat your oven to 350°F (175°C). Grease and flour two 9-inch round cake pans.
- In a large bowl, cream together the softened butter and granulated sugar until light and fluffy. Add the eggs, one at a time, mixing well after each addition.
- Stir in the coconut milk, crushed pineapple, and vanilla extract. Mix until combined.
- In another bowl, whisk together the flour, baking powder, shredded coconut, and salt. Gradually add this dry mixture to the wet ingredients, mixing until just combined.
- Divide the batter evenly between the prepared cake pans. Bake for 25-30 minutes, or until a toothpick inserted in the center comes out clean.
- Let the cakes cool in the pans for 10 minutes before transferring them to wire racks to cool completely.
- For the frosting, whip the heavy cream until soft peaks form. Gradually add the powdered sugar and continue whipping until stiff peaks form.
- Once the cakes are completely cool, spread a layer of frosting on top of one cake layer, then place the second layer on top. Frost the top and sides of the cake.
- Decorate with toasted coconut and pineapple slices. Slice and enjoy your Tropical Coconut Pineapple Cake!
Fluffy Strawberry Shortcake For A Perfect Summer Dessert

Summer is the perfect time to enjoy light and refreshing desserts. Fluffy strawberry shortcake is a classic choice that never disappoints. This treat combines soft, airy biscuits with sweet, juicy strawberries and whipped cream. It’s a delightful way to celebrate the season’s bounty.
The image showcases a beautiful stack of strawberry shortcake. The layers of fluffy biscuits are topped with fresh strawberries and a dollop of whipped cream. The vibrant red strawberries pop against the soft, golden biscuits, making it not only delicious but also visually appealing. The mint leaves add a touch of freshness, enhancing the overall look.
Making this dessert is simple and fun. You can enjoy it at a picnic, a family gathering, or just as a sweet treat at home. The combination of flavors and textures is sure to please everyone. Let’s get into the recipe so you can create this summer delight!
Zesty Key Lime Pie For A Cool Refreshment
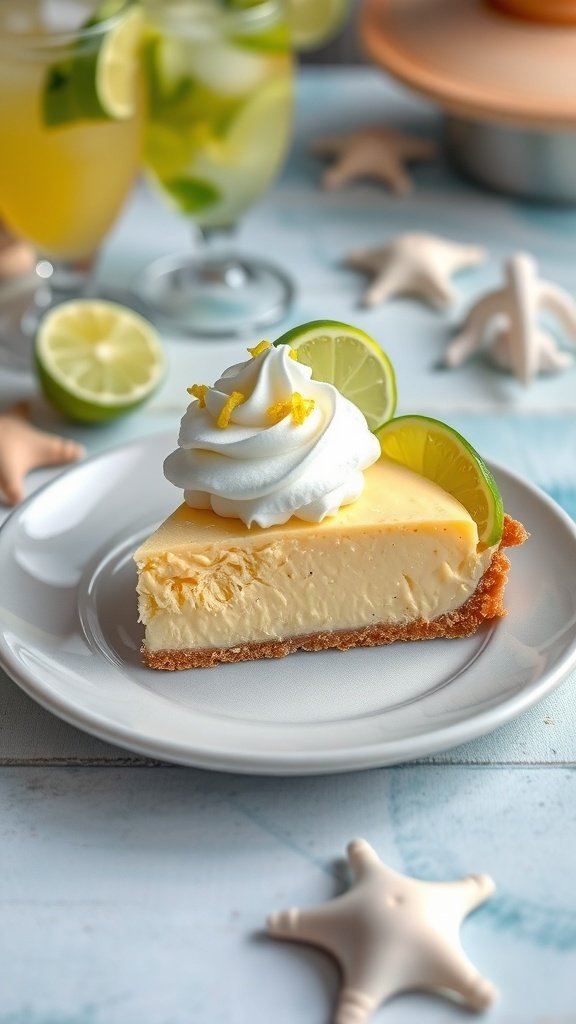
Summer is the perfect time for a refreshing dessert, and nothing beats a classic Key Lime Pie. This treat is bright, tangy, and oh-so-cool, making it a favorite for warm days. The image captures a slice of this delicious pie, topped with a dollop of whipped cream and garnished with lime slices. The crust looks perfectly golden, hinting at the delightful crunch that awaits.
The vibrant colors of the lime and the creamy filling create a visual feast. It’s not just about taste; it’s also about presentation. Pair this pie with a cool drink, and you’ve got a summer gathering ready to go!
Making Key Lime Pie is simple and rewarding. You’ll need just a few ingredients to whip up this delightful dessert. Let’s get started on your own zesty creation!
Mouthwatering Watermelon Cake For A Fun Summer Celebration
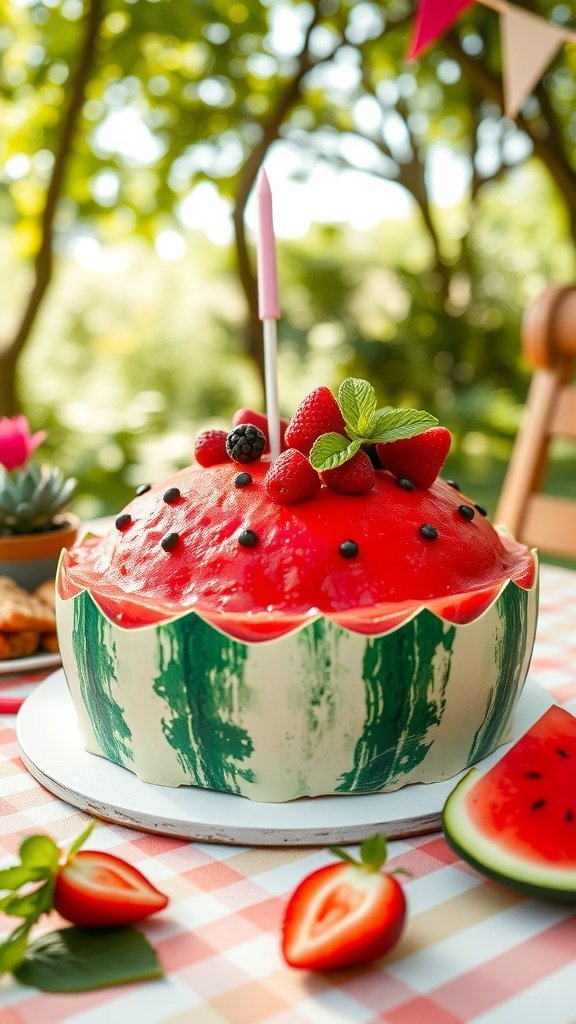
Summer is the perfect time for fun and delicious treats, and a watermelon cake fits the bill perfectly. This cake is not only a feast for the eyes but also a delight for the taste buds. Imagine a cake that looks like a watermelon, complete with vibrant red frosting and green rind. It’s a showstopper for any summer gathering!
The cake is adorned with fresh berries and mint leaves, adding a pop of color and flavor. It’s light, refreshing, and perfect for warm days. Whether it’s a birthday party, picnic, or just a sunny afternoon, this cake will surely impress your guests.
Making this cake is easier than it looks. You’ll need simple ingredients and a little creativity. The result is a fun dessert that brings smiles all around. Let’s get into the recipe so you can whip up this delightful treat!
Classic Vanilla Ice Cream For The Ultimate Summer Treat

Summer is the perfect time to enjoy a refreshing treat, and nothing beats classic vanilla ice cream. Picture a soft-serve cone topped with chocolate syrup and colorful sprinkles, surrounded by vibrant flowers. This image captures the essence of summer joy, making it hard to resist a scoop (or two!).
Making your own vanilla ice cream is simple and rewarding. You can customize it to your liking, adding toppings or mix-ins. It’s a fun activity for families and friends, bringing everyone together for a sweet moment.
Let’s get into the ingredients and steps to whip up this delightful summer treat!
Ingredients
- 2 cups heavy cream
- 1 cup whole milk
- 3/4 cup granulated sugar
- 1 tablespoon pure vanilla extract
- 1/2 teaspoon salt
Instructions
- Mix Ingredients: In a large bowl, whisk together the heavy cream, whole milk, sugar, vanilla extract, and salt until the sugar is dissolved.
- Chill Mixture: Cover the bowl and refrigerate the mixture for at least 2 hours, or overnight for best results.
- Churn Ice Cream: Pour the chilled mixture into an ice cream maker and churn according to the manufacturer’s instructions until it reaches a soft-serve consistency.
- Freeze: Transfer the ice cream to an airtight container and freeze for at least 4 hours to firm up.
- Serve: Scoop into cones or bowls, and top with your favorite sauces and sprinkles. Enjoy!
Easy No-Bake Cheesecake For A Cool Summer Delight

Summer is the perfect time for light and refreshing desserts. A no-bake cheesecake fits the bill perfectly. This cheesecake is creamy, smooth, and topped with fresh berries and a drizzle of fruit sauce. It’s a delightful treat that won’t heat up your kitchen.
The image shows a slice of cheesecake on a lovely plate, garnished with vibrant berries and a sweet sauce. The surrounding flowers add a cheerful touch, making it an inviting summer dessert. This cheesecake is not only easy to make but also a crowd-pleaser at any summer gathering.
Let’s get into the ingredients and steps to whip up this delicious no-bake cheesecake!
Ingredients
- 1 ½ cups graham cracker crumbs
- ½ cup unsalted butter, melted
- 2 cups cream cheese, softened
- 1 cup powdered sugar
- 1 teaspoon vanilla extract
- 1 cup heavy whipping cream
- Fresh berries (strawberries, blueberries, raspberries)
- Berry sauce (store-bought or homemade)
Instructions
- Prepare the Crust: In a bowl, mix graham cracker crumbs and melted butter until combined. Press the mixture into the bottom of a 9-inch springform pan to form a crust.
- Make the Filling: In another bowl, beat the cream cheese until smooth. Gradually add powdered sugar and vanilla extract, mixing until well combined.
- Whip the Cream: In a separate bowl, whip the heavy cream until stiff peaks form. Gently fold the whipped cream into the cream cheese mixture until fully incorporated.
- Combine: Pour the filling over the crust in the springform pan. Smooth the top with a spatula.
- Chill: Cover and refrigerate for at least 4 hours, or until set.
- Serve: Once set, remove the cheesecake from the springform pan. Top with fresh berries and drizzle with berry sauce before slicing and serving.