Refreshing Summer Baking Recipes to Try This Season
Summer is the perfect time to fire up your oven and indulge in some delicious baking that captures the bright flavors of the season. From light cakes to fruity pastries, these summer baking recipes are easy to whip up and will keep you cool and satisfied during those warm sunny days. Get ready to add some sweet sunshine to your table!
This Website contains affiliate links. That means I may earn a small commission if you purchase through my links, at no extra cost to you.
Delightful Summer Berry Tart

Summer is the perfect time to enjoy fresh berries, and what better way to celebrate than with a delightful berry tart? This tart is a feast for the eyes and the taste buds, featuring a buttery crust filled with creamy custard and topped with a colorful array of strawberries, blueberries, raspberries, and blackberries. The vibrant colors and fresh flavors make it a standout dessert for any summer gathering.
To make this tart, start with a simple pastry crust. Once baked, fill it with a luscious custard made from eggs, sugar, and milk. After letting it cool, pile on your favorite summer berries. The combination of sweet and tart flavors, along with the creamy texture, creates a delightful experience in every bite.
Don’t forget to garnish with fresh mint leaves for an extra pop of color and flavor. This berry tart is not just a treat for the palate; it’s also a beautiful centerpiece for your summer table.
Ingredients
- 1 1/4 cups all-purpose flour
- 1/4 cup powdered sugar
- 1/2 cup unsalted butter, softened
- 1 large egg yolk
- 1/4 cup heavy cream
- 2 cups mixed fresh berries (strawberries, blueberries, raspberries, blackberries)
- 1 cup milk
- 1/2 cup granulated sugar
- 3 large eggs
- 1 teaspoon vanilla extract
- Fresh mint leaves for garnish
Instructions
- Make the Crust: In a bowl, mix flour and powdered sugar. Cut in butter until crumbly. Stir in egg yolk and cream until dough forms. Press into a tart pan and chill for 30 minutes.
- Bake the Crust: Preheat the oven to 350°F (175°C). Bake the crust for 20 minutes or until golden. Let it cool completely.
- Prepare the Custard: In a saucepan, heat milk and sugar until warm. In a bowl, whisk eggs and vanilla. Gradually add warm milk to eggs, stirring constantly. Return to the saucepan and cook over low heat until thickened.
- Assemble the Tart: Pour the custard into the cooled crust. Arrange the fresh berries on top. Chill in the refrigerator for at least 2 hours before serving.
- Serve: Garnish with fresh mint leaves and enjoy your delightful summer berry tart!
Refreshing Lemon Blueberry Muffins
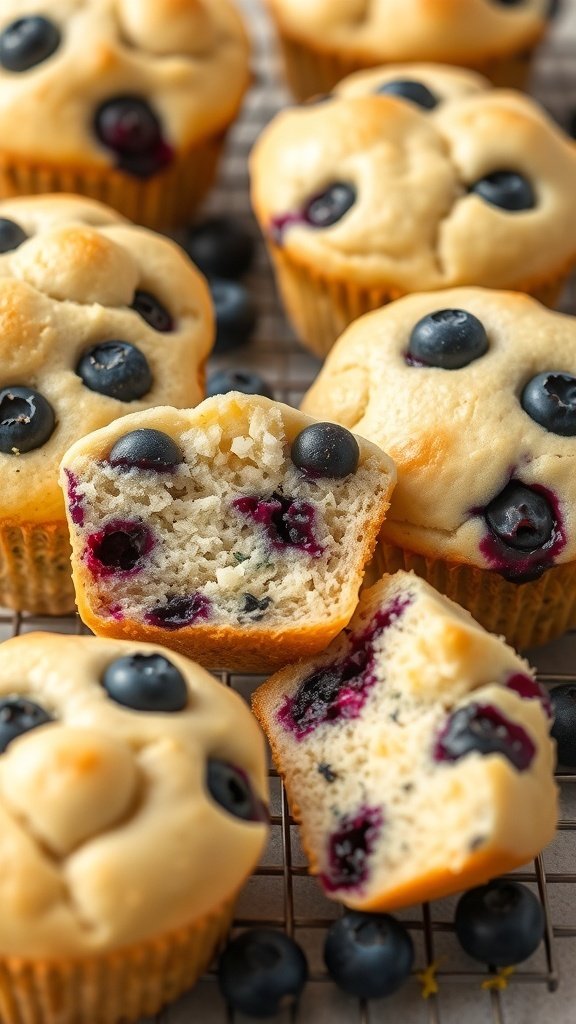
Summer is the perfect time for light and refreshing treats, and what could be better than lemon blueberry muffins? These muffins are bursting with juicy blueberries and a zesty lemon flavor that brightens up any day. They are soft, fluffy, and incredibly easy to make, making them a great addition to your summer baking repertoire.
Imagine biting into a warm muffin, the sweetness of blueberries mingling with the tangy lemon. It’s a delightful combination that’s sure to please everyone. These muffins are perfect for breakfast, snacks, or even dessert. Plus, they’re a great way to use fresh summer blueberries!
Ingredients
- 1 ½ cups all-purpose flour
- ½ cup granulated sugar
- 2 teaspoons baking powder
- ½ teaspoon salt
- 1 large egg
- ½ cup milk
- ⅓ cup vegetable oil
- 1 tablespoon lemon zest
- 2 tablespoons lemon juice
- 1 cup fresh blueberries
Instructions
- Preheat your oven to 375°F (190°C) and line a muffin tin with paper liners.
- In a large bowl, whisk together the flour, sugar, baking powder, and salt.
- In another bowl, mix the egg, milk, vegetable oil, lemon zest, and lemon juice until well combined.
- Pour the wet ingredients into the dry ingredients and stir until just combined. Be careful not to overmix.
- Gently fold in the blueberries.
- Divide the batter evenly among the muffin cups, filling each about ¾ full.
- Bake for 18-20 minutes, or until a toothpick inserted into the center comes out clean.
- Let the muffins cool in the pan for a few minutes before transferring them to a wire rack to cool completely.
Classic Peach Cobbler With A Twist

Peach cobbler is a summer staple that brings warmth and comfort to any gathering. This version has a delightful twist that makes it stand out. The image shows a golden-brown cobbler topped with a scoop of vanilla ice cream, sitting on a vibrant floral tablecloth. Fresh peaches peek through the fluffy crust, inviting you to dig in.
This recipe is simple and perfect for those sunny days when you want to enjoy something sweet. The combination of juicy peaches and a buttery topping creates a treat that everyone will love. Plus, serving it warm with ice cream is a must!
Let’s get started on this delicious twist on a classic peach cobbler!
Ingredients
- 4 cups fresh peaches, sliced
- 1 cup granulated sugar, divided
- 1 teaspoon cinnamon
- 1 tablespoon lemon juice
- 1 cup all-purpose flour
- 1 tablespoon baking powder
- 1/2 teaspoon salt
- 1 cup milk
- 1/2 cup unsalted butter, melted
- 1 teaspoon vanilla extract
Instructions
- Preheat your oven to 350°F (175°C).
- In a bowl, mix the sliced peaches with 1/2 cup of sugar, cinnamon, and lemon juice. Let it sit for about 10 minutes.
- In another bowl, combine flour, baking powder, salt, and the remaining sugar. Stir in milk, melted butter, and vanilla until just combined.
- Pour the peach mixture into a greased baking dish. Then, pour the batter over the peaches without stirring.
- Bake for 40-45 minutes or until the top is golden and a toothpick comes out clean.
- Serve warm with a scoop of vanilla ice cream on top!
Decadent Chocolate Zucchini Bread
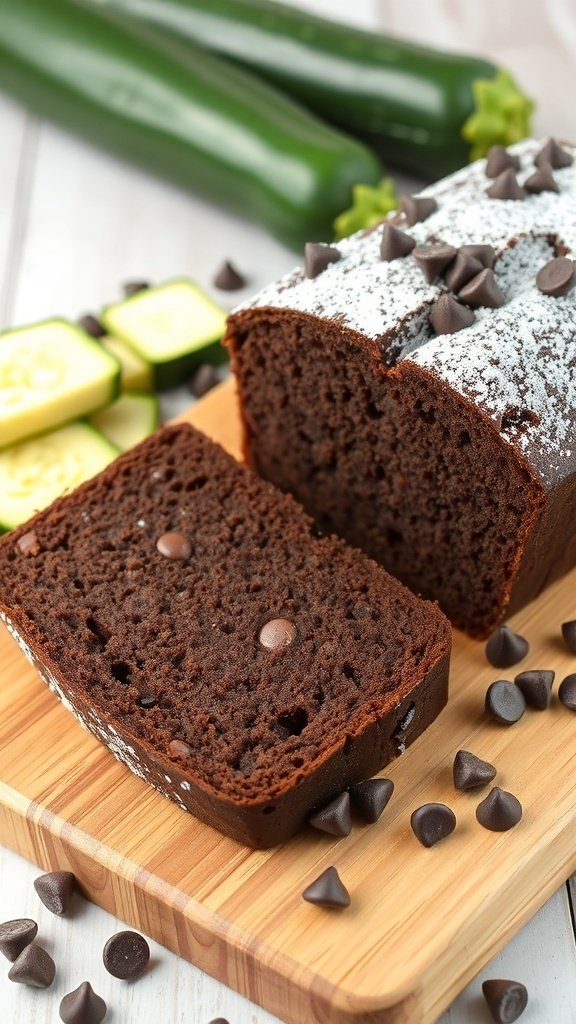
Chocolate zucchini bread is a delightful treat that combines the rich taste of chocolate with the subtle moisture of zucchini. This recipe is perfect for summer baking, as it allows you to use fresh garden zucchini. The bread is soft, moist, and packed with chocolate chips, making it a favorite for both kids and adults.
In the image, you can see a beautifully baked loaf of chocolate zucchini bread, sliced to reveal its rich, dark interior. The bread is topped with a light dusting of powdered sugar and scattered chocolate chips, adding a touch of sweetness and visual appeal. Fresh zucchini sits nearby, reminding us of the secret ingredient that makes this bread so moist.
This recipe is simple and fun to make. You can enjoy it as a snack, dessert, or even breakfast. Let’s get started with the ingredients and instructions!
Light And Airy Strawberry Shortcake

Nothing says summer quite like a light and airy strawberry shortcake. This delightful dessert is perfect for warm days when you want something sweet but not too heavy. The fluffy layers of cake, fresh strawberries, and whipped cream create a refreshing treat that everyone will love.
The image captures a beautiful strawberry shortcake, stacked high with layers of soft cake, luscious cream, and bright red strawberries. The vibrant colors of the strawberries and the delicate white cream are a feast for the eyes, making it an inviting dessert for any gathering. Garnished with fresh mint, this cake looks as good as it tastes!
Making your own strawberry shortcake is simple and rewarding. You can enjoy the process of baking and assembling this classic dessert, and the results are sure to impress your family and friends.
Ingredients
- 2 cups all-purpose flour
- 1/4 cup granulated sugar
- 1 tablespoon baking powder
- 1/2 teaspoon salt
- 1/2 cup unsalted butter, cold and cubed
- 1 cup heavy cream
- 1 teaspoon vanilla extract
- 4 cups fresh strawberries, hulled and sliced
- 1/4 cup powdered sugar (for strawberries)
- 1 cup heavy cream (for whipped cream)
- 1/4 cup powdered sugar (for whipped cream)
- 1 teaspoon vanilla extract (for whipped cream)
Instructions
- Preheat the oven to 400°F (200°C). Grease and flour two round cake pans.
- In a large bowl, mix flour, granulated sugar, baking powder, and salt. Cut in the cold butter until the mixture resembles coarse crumbs.
- Stir in 1 cup of heavy cream and 1 teaspoon of vanilla extract until just combined. Do not overmix.
- Divide the batter evenly between the prepared pans. Bake for 20-25 minutes or until golden brown and a toothpick comes out clean.
- While the cakes cool, prepare the strawberries. Toss sliced strawberries with 1/4 cup powdered sugar and let them sit for about 30 minutes to release their juices.
- For the whipped cream, beat 1 cup of heavy cream with 1/4 cup powdered sugar and 1 teaspoon vanilla extract until soft peaks form.
- Once the cakes are completely cool, layer them with whipped cream and strawberries. Start with one cake layer, add whipped cream, then strawberries, and repeat with the second layer.
- Top with more whipped cream and garnish with mint leaves. Serve immediately and enjoy!
Tropical Coconut Pineapple Cake

This Tropical Coconut Pineapple Cake is a delightful treat perfect for summer gatherings. The layers of fluffy cake are infused with coconut and pineapple, bringing a taste of the tropics to your table. The cake is topped with a creamy frosting and garnished with fresh pineapple and toasted coconut, making it not just delicious but also visually stunning.
Imagine enjoying a slice of this cake while lounging by the beach or at a backyard barbecue. The combination of sweet pineapple and rich coconut creates a refreshing flavor that everyone will love. It’s a great way to celebrate summer vibes and impress your friends.
Ingredients
- 2 cups all-purpose flour
- 1 1/2 cups granulated sugar
- 1 cup unsweetened shredded coconut
- 1/2 cup unsalted butter, softened
- 1 cup buttermilk
- 3 large eggs
- 1 teaspoon vanilla extract
- 1 teaspoon baking powder
- 1 teaspoon baking soda
- 1/2 teaspoon salt
- 1 cup crushed pineapple, drained
- 2 cups whipped cream for frosting
- Fresh pineapple and toasted coconut for garnish
Instructions
- Preheat your oven to 350°F (175°C). Grease and flour three 8-inch round cake pans.
- In a large bowl, cream together the softened butter and sugar until light and fluffy. Add the eggs one at a time, mixing well after each addition.
- Stir in the buttermilk and vanilla extract. In another bowl, combine the flour, baking powder, baking soda, salt, and shredded coconut.
- Gradually add the dry ingredients to the wet mixture, mixing until just combined. Fold in the crushed pineapple.
- Divide the batter evenly among the prepared pans. Bake for 25-30 minutes, or until a toothpick inserted into the center comes out clean.
- Let the cakes cool in the pans for 10 minutes before transferring them to wire racks to cool completely.
- Once cooled, spread whipped cream between the layers and on top of the cake. Garnish with fresh pineapple and toasted coconut.
Easy No-Bake Chocolate Cream Pie
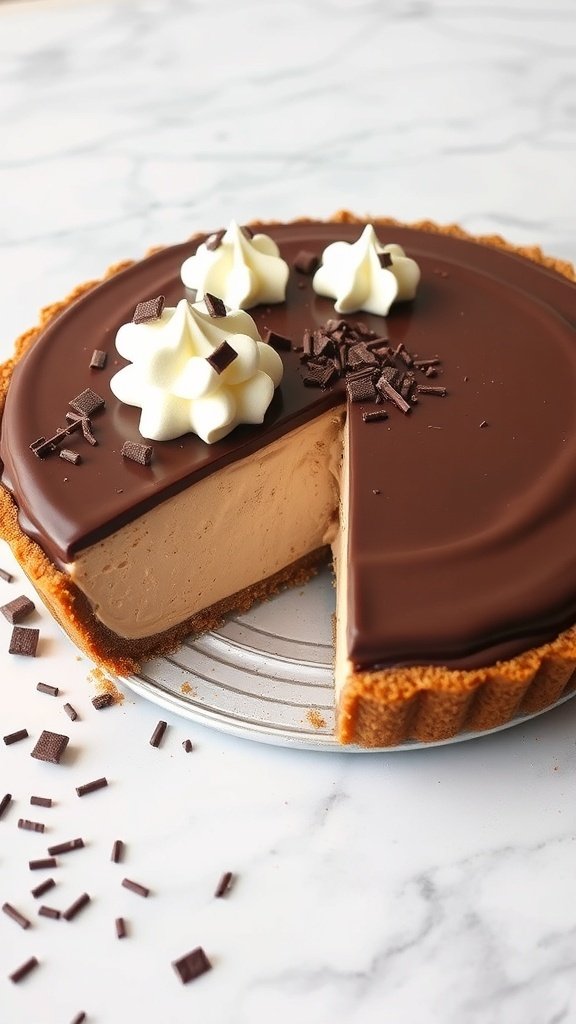
Summer is the perfect time for light and refreshing desserts, and nothing fits that bill better than a no-bake chocolate cream pie. This dessert is not only simple to make but also incredibly satisfying. The image shows a beautifully crafted pie with a smooth chocolate filling, topped with whipped cream and chocolate shavings. It’s a treat that’s sure to impress your family and friends.
The best part about this pie is that it requires no baking, making it ideal for those hot summer days when you want something sweet without heating up the kitchen. The creamy chocolate filling is rich and indulgent, while the crust adds a nice crunch. It’s a delightful combination that everyone will love.
Let’s get started on making this easy no-bake chocolate cream pie!
Ingredients
- 1 pre-made graham cracker crust
- 1 cup heavy cream
- 1 cup chocolate chips
- 1/2 cup powdered sugar
- 1 teaspoon vanilla extract
- 1/2 cup cream cheese, softened
- Chocolate shavings for garnish
Instructions
- Prepare the Filling: In a medium saucepan, heat the heavy cream over medium heat until it begins to simmer. Remove from heat and add the chocolate chips. Stir until melted and smooth.
- Mix the Cream Cheese: In a separate bowl, beat the softened cream cheese with powdered sugar and vanilla extract until creamy.
- Combine: Gradually add the melted chocolate mixture to the cream cheese mixture, stirring until well combined.
- Fill the Crust: Pour the chocolate filling into the pre-made graham cracker crust, smoothing the top with a spatula.
- Chill: Refrigerate the pie for at least 4 hours or until set.
- Serve: Before serving, top with whipped cream and chocolate shavings for a finishing touch.
Sweet And Sour Rhubarb Crisp
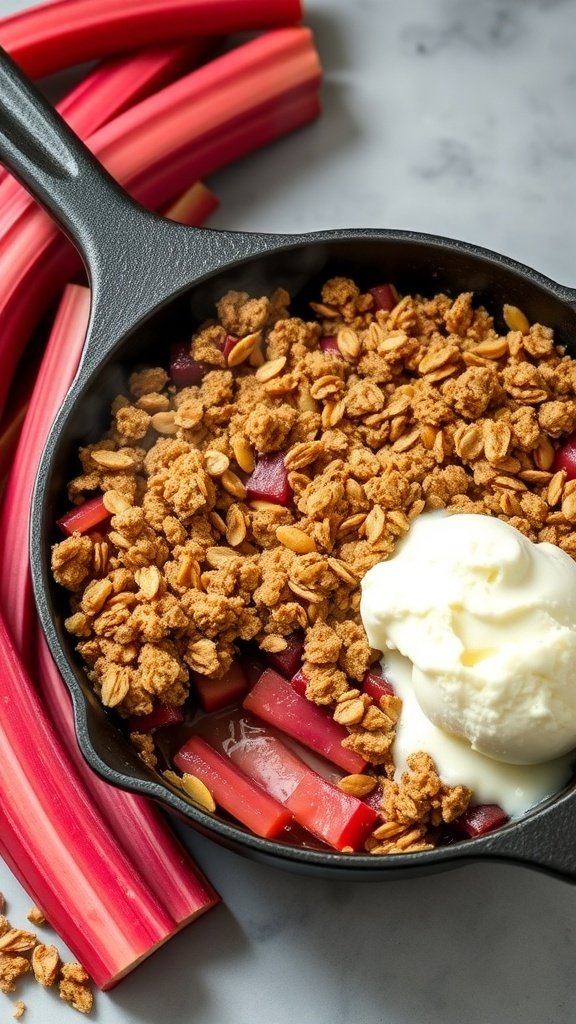
Rhubarb is a unique ingredient that brings a delightful tang to summer desserts. This Sweet and Sour Rhubarb Crisp is a perfect way to showcase its vibrant flavor. The image captures a warm, golden topping over tender rhubarb, with a scoop of creamy ice cream on the side. The contrast of textures and flavors makes this dish a summer favorite.
The crisp topping, made with oats and brown sugar, adds a satisfying crunch. Pairing it with the tartness of rhubarb creates a sweet and sour experience that’s hard to resist. It’s an easy recipe that’s perfect for gatherings or a cozy night in.
Let’s get started on making this delicious dessert!
Ingredients
- 4 cups rhubarb, chopped
- 1 cup granulated sugar
- 1 tablespoon cornstarch
- 1 teaspoon vanilla extract
- 1 cup rolled oats
- 1 cup all-purpose flour
- 1/2 cup brown sugar, packed
- 1/2 cup unsalted butter, melted
- 1/2 teaspoon cinnamon
Instructions
- Preheat your oven to 350°F (175°C).
- In a mixing bowl, combine the chopped rhubarb, granulated sugar, cornstarch, and vanilla extract. Stir until the rhubarb is well coated.
- Transfer the rhubarb mixture to a greased baking dish.
- In another bowl, mix the oats, flour, brown sugar, melted butter, and cinnamon until crumbly.
- Spread the oat mixture evenly over the rhubarb.
- Bake for 30-35 minutes, or until the topping is golden brown and the rhubarb is bubbly.
- Let it cool slightly before serving. Enjoy with a scoop of ice cream!
Zesty Key Lime Pie

Key Lime Pie is a classic summer dessert that brings a burst of citrus flavor to your table. The image showcases a beautifully presented slice of this pie, sitting on a vibrant blue plate. The pie features a smooth, creamy filling that is a lovely shade of yellow, topped with fluffy whipped cream and garnished with fresh lime slices. Surrounding the pie are some lime halves and tropical decorations, setting a cheerful summer vibe.
This dessert is perfect for warm days, offering a refreshing taste that balances sweetness and tartness. The graham cracker crust adds a delightful crunch, making each bite a treat. Whether you’re hosting a summer gathering or enjoying a quiet evening, Key Lime Pie is sure to impress.
Ingredients
- 1 ½ cups graham cracker crumbs
- ½ cup granulated sugar
- ½ cup unsalted butter, melted
- 4 large egg yolks
- 1 can (14 ounces) sweetened condensed milk
- ½ cup fresh key lime juice
- 1 teaspoon lime zest
- Whipped cream for topping
- Fresh lime slices for garnish
Instructions
- Preheat the oven to 350°F (175°C).
- In a bowl, mix graham cracker crumbs, sugar, and melted butter until combined. Press this mixture into the bottom and up the sides of a pie dish.
- Bake the crust for 8-10 minutes until golden. Remove from the oven and let it cool.
- In another bowl, whisk together egg yolks, sweetened condensed milk, key lime juice, and lime zest until smooth.
- Pour the filling into the cooled crust and bake for an additional 15 minutes.
- Let the pie cool at room temperature, then refrigerate for at least 3 hours before serving.
- Top with whipped cream and garnish with fresh lime slices before serving.
Fruity Summer Sorbet

Summer is the perfect time to enjoy a refreshing sorbet. This fruity summer sorbet is a delightful treat that combines the sweetness of ripe fruits with a cool, icy texture. Imagine a bowl filled with vibrant colors, featuring juicy watermelon, mango, and fresh raspberries. The bright hues and fresh ingredients make it a feast for the eyes and the taste buds.
Making sorbet at home is simple and fun. You can customize it with your favorite fruits or whatever is in season. The best part? It’s a healthier dessert option that still satisfies your sweet cravings. Serve it in a chilled bowl, and you’ll have a delightful dessert that’s perfect for hot summer days.
Ingredients
- 2 cups watermelon, cubed and seeded
- 1 cup mango, diced
- 1 cup fresh raspberries
- 1/4 cup sugar (adjust to taste)
- 1 tablespoon lime juice
- Fresh mint leaves for garnish
Instructions
- Prepare the Fruit: Start by blending the watermelon, mango, and raspberries in a blender until smooth.
- Add Sweetness: Stir in the sugar and lime juice. Taste and adjust the sweetness if needed.
- Freeze the Mixture: Pour the mixture into a shallow dish and place it in the freezer. Every 30 minutes, stir the mixture with a fork to break up any ice crystals. Continue this for about 2-3 hours until it’s fully frozen and fluffy.
- Serve: Scoop the sorbet into bowls and garnish with fresh mint leaves. Enjoy your refreshing summer treat!