The Ultimate Guide to Making Delicious Chocolate Cake at Home
Here’s a sweet surprise: Nielsen reports that more than 70% of Americans crave chocolate weekly, yet most still buy boxed mixes. This guide flips that script with a step-by-step chocolate baking guide that shows how to bake chocolate cake like a pro—no pastry school needed.
This Website contains affiliate links. That means I may earn a small commission if you purchase through my links, at no extra cost to you.
If you want a moist chocolate cake that wins birthdays and bake sales, you’re in the right place. We’ll start with tools that make a difference—think OXO measuring gear and a ThermoWorks oven thermometer. Then we’ll walk through ingredient choices from King Arthur Baking flour to Ghirardelli and Valrhona cocoa, so your homemade chocolate cake tastes bold and rich every time.
This easy chocolate cake recipe roadmap covers mixing science, pan prep, baking times, and cool-down tactics for neat layers. You’ll also learn when to use baking powder or baking soda, plus how buttermilk, sour cream, and oil build a tender crumb. Later, we’ll explore ganache, buttercream, and cream cheese frosting, along with simple décor ideas and smart storage. Consider this your trusted path to the best chocolate cake at home.
Key Takeaways
- Use an oven thermometer and weigh ingredients for repeatable results.
- Choose the right cocoa: natural vs. Dutch-processed affects flavor and leavening.
- Buttermilk, sour cream, and oil help achieve a moist chocolate cake.
- Follow clear mixing steps to avoid overmixing and tunneling.
- Test doneness early to keep the best chocolate cake soft and rich.
- Learn how to bake chocolate cake with pro tips for pans, timing, and cooling.
- Finish strong with frostings and fillings that elevate a homemade chocolate cake.
Why Bake at Home: Benefits of a Homemade Dessert
A warm, fresh chocolate cake cools on your counter and the kitchen smells amazing. That scene sums up the benefits of baking at home. With from-scratch baking, you shape flavor and texture from the first whisk. You decide the cocoa, the chocolate, and the level of sweetness, and you skip preservatives found in shelf-stable cakes.
Control over ingredients matters. Choose Valrhona or Ghirardelli cocoa, add real vanilla, and adjust sugar for taste or diet. If you need gluten-free, dairy-free, or egg-free, you can make a batter that fits. These homemade dessert benefits extend to food safety as well—clean tools, proper bake times, and careful cooling are in your hands.
Texture is the payoff. A fresh chocolate cake baked today has a moist crumb and tender bite that many boxed or display-case cakes can’t rival. From-scratch baking lets you fold in espresso for depth, orange zest for lift, or a pinch of chili for warmth without dulling the cocoa notes.
Value counts, too. Compare the cost of homemade cake vs store-bought and you’ll often come out ahead, especially with layered cakes. Your pantry buys stretch to generous slices, custom fillings, and finishes without the premium markup or long lead times of custom orders.
There’s a creative lift as well. Measuring, mixing, and frosting can ease stress and build kitchen confidence. The homemade dessert benefits show up at birthdays, potlucks, and weeknights alike, where from-scratch baking turns simple ingredients into something personal and memorable.
When you bake at home, you set the rules—size, shape, fillings, and decor. That level of control over ingredients and design helps the cake match the moment. And when the first slice lands on the plate, the fresh chocolate cake proves why the effort is worth it.
Essential Baking Tools for Success
Great gear turns a good recipe into a reliable ritual. Choose tools that keep heat even, measurements honest, and layers neat. A few smart picks today prevent dry crumbs and sunken centers tomorrow.
Must-have pans and mixing equipment
Reach for light-colored aluminum cake pans from USA Pan, Fat Daddio’s, or Wilton. Go 8- or 9-inch rounds, 2 inches deep, for steady rise and clean edges. Skip dark nonstick for long bakes to avoid over-browning.
Debating stand mixer vs hand mixer? A KitchenAid stand mixer excels at creaming butter and sugar, while a strong hand mixer handles small batches without fuss. Keep a balloon whisk for dry ingredients, silicone spatulas for folding, and a fine-mesh sieve to smooth cocoa and flour. Sturdy glass or stainless bowls, with at least one 4–5 quart, keep mixing stable.
Measuring tools for accuracy
A digital kitchen scale from OXO or Escali locks in consistency—aim for about 120–130 grams per cup of flour based on brand guidance. Use metal dry cups for flour and sugar, and Pyrex or OXO liquids for milk, oil, and coffee. Include a 1/8-teaspoon spoon for precise leavening and salt. Accurate measuring keeps cakes tender, not dense.
Oven thermometers and preparation aids
Home ovens drift. A trusty oven thermometer by ThermoWorks or Taylor verifies heat so timing stays true. Two 8-inch pans bake taller than two 9-inch, so check earlier for doneness and adjust minutes as needed.
Line pans with precut parchment rounds and a light coat of Baker’s Joy or Pam Baking. Use an offset spatula and straight spatula for smooth batter and frosting, plus a bench scraper and rotating turntable for clean sides. Cool layers on a wire cooling rack to avoid soggy bottoms.
| Tool | Best Use | Why It Matters | Brands/Notes |
|---|---|---|---|
| Light aluminum cake pans | Even baking, tall layers | Prevents over-browning, releases cleanly | USA Pan, Fat Daddio’s, Wilton; 8–9 inch, 2-inch deep |
| Stand mixer vs hand mixer | Creaming, whipping, small batches | Power for structure; flexibility for quick tasks | KitchenAid stand mixer; quality hand mixer for portability |
| Kitchen scale | Weighing flour, cocoa, sugar | Consistency across bakes, avoids dense crumbs | OXO, Escali; target 120–130 g per cup flour |
| Oven thermometer | Verifying true oven temp | Corrects 25–50°F drift for accurate timing | ThermoWorks, Taylor; place center rack |
| Parchment rounds | Nonstick pan lining | Prevents tearing, speeds release | Precut rounds fit standard pans |
| Offset spatula | Smoothing batter, frosting edges | Control and clean angles for finishes | Use small offset for detail, long for tops |
| Cooling rack | Airflow under cakes | Stops steam buildup and soggy bottoms | Wire grid with sturdy feet |
Choosing Quality Ingredients for Rich Flavor
Great chocolate cake starts with smart choices. Match your cocoa, chocolate, and fats to the style you want. Keep staples fresh, and your crumb will stay soft while the flavor pops.
Types of cocoa powder: natural vs. Dutch-processed
Understanding natural cocoa vs Dutch cocoa helps you tune taste and lift. Natural cocoa from brands like Hershey’s Natural or King Arthur has bright, fruity notes and works well with baking soda. Dutch-processed options such as Valrhona cocoa, Droste, and Guittard Rouge are darker, smoother, and often pair with baking powder or a mix of leaveners.
For a deeper profile, some bakers blend both styles. Always sift to avoid lumps, and bloom the cocoa with hot water or coffee to amplify aroma and color.
Best chocolate for baking: chips, bars, and couverture
When the recipe calls for melting, reach for bars or couverture from trusted baking chocolate brands. Valrhona, Guittard, Callebaut, and a Ghirardelli baking bar melt cleanly thanks to higher cocoa butter. Chocolate chips are great as mix-ins, but stabilizers help them hold shape, so they resist smooth melting in batters and ganache.
Choose 54–70% dark depending on sweetness. Lower percentages are mellow and kid-friendly; higher ones taste bolder and less sweet.
Flour, sugar, and fats: how each affects texture
Pick the base that fits your goal. All-purpose flour for cake provides structure and a steady crumb, while cake flour like Swan’s Down yields extra tenderness. Sugar adds sweetness and locks in moisture; brown sugar brings a hint of molasses.
Decide on oil vs butter cake based on texture and flavor. Neutral oil keeps layers moist and soft. Butter adds rich taste and helps aerate during creaming. Cocoa can dry a batter, so balance with enough fat and liquid for a plush bite.
Freshness matters: eggs, dairy, and leaveners
Use large eggs at room temperature for smooth mixing. Whole milk, buttermilk, or sour cream add fat and gentle acidity that keeps the crumb tender. Salt and pure vanilla, like Nielsen-Massey, round out chocolate notes.
Leaveners lose power over time. Always check soda and keep fresh baking powder on hand. A quick test before mixing can save a dense, under-risen cake.
| Ingredient Choice | Role in Cake | When to Use | Pro Tip |
|---|---|---|---|
| Natural cocoa vs Dutch cocoa | Flavor and color | Natural for brighter notes; Dutch for smooth depth | Sift and bloom with hot liquid for intensity |
| Valrhona cocoa | Dark hue, refined taste | When you want a luxe, bakery-style profile | Pair with baking powder or mixed leaveners |
| Ghirardelli baking bar | Clean melt for ganache and batters | For smooth frostings, sauces, and moist layers | Choose 60–70% for balance of sweetness and bite |
| All-purpose flour for cake | Structure and stability | Everyday layers and sturdy stacking | Weigh flour to avoid a dry crumb |
| Oil vs butter cake | Moisture vs flavor | Oil for plush texture; butter for rich taste | Use a blend to get both tenderness and aroma |
| Fresh baking powder | Lift and lightness | Essential for Dutch cocoa or combo recipes | Replace every few months for reliable rise |
| Baking chocolate brands | Consistency and melt quality | Bars or couverture for mixing and glazing | Stick to Valrhona, Guittard, Callebaut, or Ghirardelli |
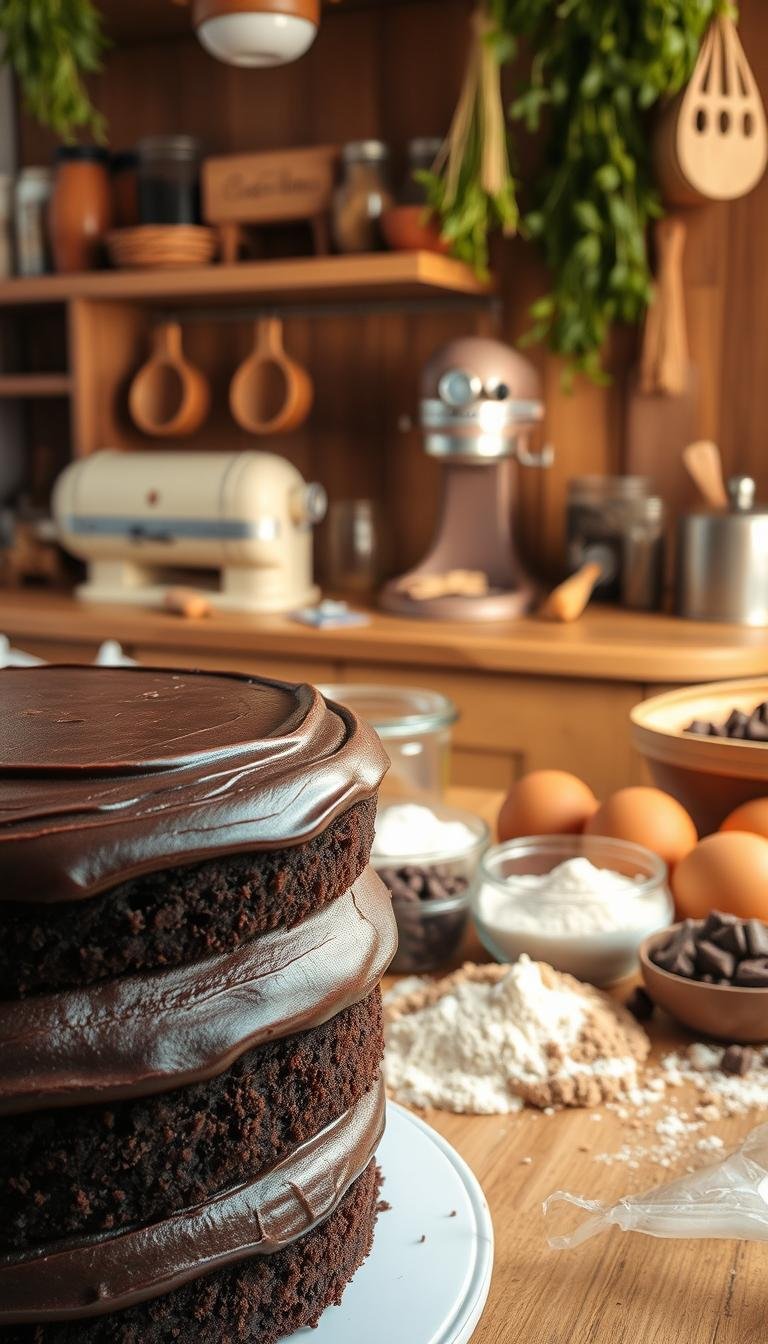
chocolate cake
A classic chocolate cake recipe shines when you keep it simple and smart. Gather the best chocolate cake ingredients: all-purpose flour (or a blend with cake flour), Dutch-processed cocoa, granulated sugar, large eggs, neutral oil, whole milk or buttermilk, hot coffee or espresso, baking powder, baking soda, fine salt, and pure vanilla extract. This mix sets up a moist, tender crumb and deep flavor in a chocolate layer cake.
The most reliable approach follows clear chocolate cake steps. Sift the dry ingredients. Whisk the wet ingredients in a separate bowl. Pour wet into dry and mix just until smooth. Add the hot coffee last to bloom the cocoa and create a glossy, fluid batter. Bake in two 8-inch or 9-inch round pans at 350°F until a toothpick shows a few moist crumbs, about 25–35 minutes depending on your oven.
For an easy weeknight win, a one-bowl chocolate cake also works. Whisk everything in one large bowl, keeping the same order and gentle mixing. Cool the layers in the pans for 10–15 minutes, then invert onto racks. Once cool, stack and frost with chocolate buttercream, silky ganache, or tangy cream cheese frosting. Add raspberry jam or chocolate mousse between layers for a bakery-style finish.
Pro tip: Line pans with parchment and run an oven thermometer to keep timing honest. Smooth, even layers help every slice look clean and taste balanced.
| Step | What To Do | Why It Matters | Notes for Success |
|---|---|---|---|
| Prep Pans | Grease and line two 8-inch or 9-inch rounds with parchment. | Prevents sticking and keeps edges neat for a chocolate layer cake. | Trace the pans; trim parchment for a snug fit. |
| Sift Dry | Flour, Dutch-processed cocoa, sugar, baking powder, baking soda, and salt. | Removes lumps and blends leavening for even rise in a classic chocolate cake recipe. | Use a fine-mesh sieve for light, even aeration. |
| Whisk Wet | Eggs, oil, milk or buttermilk, and vanilla. | Adds structure and moisture using the best chocolate cake ingredients. | Room-temperature eggs mix faster and trap more air. |
| Combine | Mix wet into dry until smooth; add hot coffee last. | Blooms cocoa and creates a pourable batter; core of the chocolate cake steps. | Do not overmix; a few small bubbles are fine. |
| Bake | 350°F for 25–35 minutes, until a few moist crumbs cling to a tester. | Ensures a soft, moist crumb in a one-bowl chocolate cake or standard method. | Rotate pans once if your oven has hot spots. |
| Cool & Finish | Cool 10–15 minutes, invert to racks, frost when fully cool. | Prevents sinking and melting frosting; sets layers for clean stacking. | Choose buttercream, ganache, or cream cheese for flavor and sheen. |
Perfecting the Batter: Mixing Methods Explained
Great texture starts with smart technique. When mixing chocolate cake batter, choose a method that fits your goal and pan. Keep ingredients at room temperature to help emulsify, and measure with care to avoid tough cake.
Creaming vs. reverse creaming
Use the creaming method when you want lift and a fine crumb. Beat softened butter and granulated sugar until pale and fluffy; add eggs one at a time, scraping the bowl. For balance, finish by alternating dry and wet additions so the structure stays stable.
The reverse creaming method starts by blending flour, cocoa, and sugar with butter or oil. This coats the flour, limiting gluten, which helps avoid tough cake. Expect a level top and a slightly tighter crumb that’s ideal for stacking.
When and how to add dry and wet ingredients
Sift cocoa and flour to remove lumps before mixing chocolate cake batter. In the creaming approach, add eggs one by one, then add dry and liquid in five passes—three dry, two liquid—starting and ending with dry. Keep the mixer on low.
For oil-based batters, whisk dry in one bowl and wet in another. Combine just until blended, then pour in hot coffee last to bloom the cocoa and thin the batter for even rise. This sequence helps avoid tough cake while keeping flavor deep.
Avoiding overmixing and tunneling
Overmixing creates tunnels and a rubbery bite. To avoid tough cake, stop the mixer as soon as streaks disappear, then fold by hand with a spatula. After flour goes in, avoid high speeds and long mixing.
Room-temperature dairy and eggs blend faster and cleaner. Whether you use the creaming method or the reverse creaming method, work gently after the flour is added, and rely on alternating dry and wet steps to keep the crumb tender.
Moisture and Tenderness: The Science Behind a Soft Crumb
A moist chocolate cake starts with smart choices about liquids, fats, and cocoa prep. Each piece plays a role in tenderness and lift, from how you bloom cocoa to the balance of sugar and acid. Small tweaks here make the crumb soft, even after a night in the fridge.
Role of buttermilk, sour cream, and oil
Using buttermilk in cake adds gentle acidity that weakens gluten and activates baking soda for height. It’s a fast path to a tender bite with clean flavor.
A sour cream cake brings richer body. Its fat and protein boost moisture without thinning the batter, so layers slice neatly and stay plush.
Consider oil vs butter in cake for texture. Neutral oil remains fluid when chilled, which keeps crumb softness at room temp and beyond. A blend—melted butter for aroma and oil for moistness—offers balance.
Balancing sugar and cocoa for structure
Cocoa behaves like a dry starch. Without enough sugar and liquid, it can make the crumb tight. Sugar is hygroscopic, so it draws in water and slows staling, key for a moist chocolate cake.
When using Dutch-processed cocoa, which carries more fat, add a touch more liquid to keep flow. With natural cocoa, pair the acidity with the right leavener to maintain lift and avoid a dense center.
Before mixing, whisk cocoa with hot liquid to bloom cocoa. This step deepens flavor and smooths batter, reducing dry pockets and improving structure.
Using espresso or coffee to deepen chocolate flavor
Hot coffee in chocolate cake strengthens cocoa notes without turning the flavor “coffee-like.” Replace part of the liquid with 1 cup hot brewed coffee for two 9-inch layers, and mix while warm to bloom cocoa fully.
Instant espresso dissolves fast. Brands like Medaglia d’Oro and King Arthur Espresso Powder blend cleanly into hot water, adding depth and balancing sweetness in a sour cream cake or buttermilk-based batter.
| Ingredient Choice | Primary Effect | Best Use Case | Pro Tip |
|---|---|---|---|
| Buttermilk | Tender crumb, higher rise | Light, layered cakes | Pair with baking soda for lift in buttermilk in cake recipes. |
| Sour Cream | Richness, moisture retention | Stable layers, clean slices | Use for a sour cream cake when you want plush texture. |
| Neutral Oil | Soft crumb after chilling | Make-ahead cakes | Blend oil vs butter in cake to balance flavor and tenderness. |
| Sugar | Moisture attraction | Extended freshness | Keep slightly higher than flour for a moist chocolate cake. |
| Cocoa (Natural/Dutch) | Flavor and structure | Deep chocolate profile | Adjust liquid for Dutch; match leavener for natural cocoa. |
| Espresso/Coffee | Flavor amplification | Richer chocolate notes | Use hot to bloom cocoa; add coffee in chocolate cake without overpowering. |
Preparing Pans and Preheating for Even Baking
For clean layers and even baking, start by choosing the right tins. Use two 8-inch rounds for tall layers or two 9-inch rounds for quicker bakes. Generously grease and flour pans with Baker’s Joy or a butter–flour mix, then line cake pans with parchment rounds cut to fit. Lightly grease the parchment so the cake releases without tearing.
Before mixing, preheat oven 350°F for at least 20 minutes. Confirm the heat with an oven thermometer, and set the rack position middle to promote steady airflow. Wrap Wilton Bake-Even Strips, soaked and wrung out, around each pan to limit doming and edge browning.
Fill the pans evenly and tap each one on the counter to knock out big air bubbles. This small step supports even baking and reduces tunneling. Slide the pans onto the center rack and avoid opening the door early; heat loss can cause sinking and uneven texture.
Pro tip: Trace your pans on parchment and cut stacks of liners in advance. Keeping parchment rounds on hand makes prep fast on busy bake days.
Baking Time and Temperature: Getting It Just Right
Steady heat and smart checks keep moisture locked in. Aim for a 350°F (177°C) oven, confirm with an oven thermometer, and set two timers: one for the earliest check and one for the latest. This tight window protects flavor and texture while guiding the chocolate cake bake time.
Pan sizes and their impact on timing
Different pans change how fast batter sets and browns. With 8-inch vs 9-inch pans, expect thicker layers in 8-inch rounds to need a few extra minutes. Start checks early and rotate once if your oven has hot spots.
| Pan | Oven Temp | Estimated Time | Notes |
|---|---|---|---|
| Two 8-inch rounds | 350°F (177°C) | 28–34 minutes | Thicker layer; begin checks at 28 minutes |
| Two 9-inch rounds | 350°F (177°C) | 24–30 minutes | Thinner layer; bakes faster than 8-inch |
| 9×13-inch pan | 350°F (177°C) | 30–36 minutes | Even rise; center sets last |
| Cupcakes | 350°F (177°C) | 16–20 minutes | Short window; do not overbake |
| Dark or glass pans | 325°F (163°C) | Check several minutes early | Reduce heat by 25°F to temper faster browning |
Signs your cake is done without drying out
Watch the edges pull slightly from the pan and the top spring back to a light touch. Use a toothpick test and look for a few moist crumbs, not wet streaks. For precision, an internal temperature cake reading of about 205–210°F in the center signals doneness.
Protect moisture by starting checks 3–5 minutes before the earliest time. If the toothpick test is clean and dry, it stayed in too long. Remove, cool in the pan for 10 minutes, then turn out to a rack.
High-altitude adjustments for reliable results
Lower air pressure speeds evaporation and rise. Use high altitude baking adjustments to stabilize the crumb: increase oven temperature by 15–25°F, reduce baking powder or baking soda by 1/8 to 1/4 teaspoon per teaspoon used, and check earlier.
Balance the batter to prevent collapse. Add 1–2 tablespoons liquid per cup of batter and decrease sugar by 1–2 tablespoons per cup. These shifts keep chocolate cake bake time predictable and keep texture tender even miles above sea level.
Cooling, Leveling, and Storing Layers
Smooth slices start with patience. First, cool cake layers the right way, then level cake tops, add a clean crumb coat, and choose smart methods to store cake layers. These steps protect texture, flavor, and shape so your chocolate cake looks bakery-made.

Proper cooling to prevent sinking
Set pans on a wire rack and cool cake layers for 10–15 minutes so the structure sets. Run a thin knife around the edges, invert onto racks, peel off parchment, and let them cool completely for at least 1 hour.
Frosting warm cakes traps steam. That can cause slipping and a gummy crumb. When the layers are fully cool, you lock in moisture without soggy spots.
How to level and crumb-coat like a pro
Use a long serrated knife or an adjustable leveler to level cake tops. Work on a turntable for steady motion and even cuts. Brush away loose crumbs before stacking.
Apply a thin crumb coat with an offset spatula. Spin the cake and smooth the sides with a bench scraper for neat lines. Chill for 20–30 minutes, then add the final coat for clean, sharp edges.
Short-term and long-term storage tips
Wrap each layer tightly in plastic wrap storage and add a layer of foil. Store cake layers at room temperature up to 24 hours, or refrigerate for as long as 3 days. Keep them flat to avoid bending or cracks.
For longer holds, freeze cake layers for 2–3 months. Thaw while still wrapped in the fridge overnight to prevent condensation. Finished cakes keep covered at room temp 1–2 days with shelf-stable frostings; refrigerate if using cream cheese or fresh fillings.
Frostings That Elevate Your Cake
The best frosting for chocolate cake sets flavor, shine, and structure. Think about heat, sweetness, and how you plan to decorate. Choose real cocoa or melted chocolate, unsalted European-style butter, a pinch of fine salt, and heavy cream at 36% fat. Sift Domino powdered sugar for smooth flow and steady peaks.
For a glossy finish and deep cocoa bite, ganache frosting brings polish and clean drips. Warm days favor its stability, while cool rooms keep edges sharp. If you love swirls and soft bite, chocolate buttercream pipes crisp borders and holds rosettes with ease.
When you want a tangy counterpoint, cream cheese frosting for chocolate cake balances richness and adds lift. Meringue-based buttercreams—Swiss or Italian—offer silk and less sweetness, but they need precise temperature control. Match frosting textures to the event: sleek for modern lines, fluffy for rustic charm.
Pro tip: Taste as you go. A small pinch of salt and an extra spoon of cream can turn good into great, and a splash of espresso can deepen the cocoa beat without extra sugar.
Below is a quick guide to help you choose the right finish for busy kitchens and bold flavors.
| Style | Primary Strength | Sweetness | Best Use | Stability |
|---|---|---|---|---|
| Ganache frosting | Glossy sheen, intense chocolate | Low–Medium | Drips, sleek sides, truffles | High in cool rooms |
| Chocolate buttercream | Easy piping, fluffy body | Medium–High | Borders, rosettes, cupcakes | Moderate; softens in heat |
| Cream cheese frosting for chocolate cake | Tang balances richness | Medium | Layer cakes, casual swirls | Chill to firm |
| Swiss/Italian meringue | Ultra-smooth, less sweet | Low–Medium | Silky finishes, refined details | Moderate; temperature sensitive |
Choose what serves the moment: ganache frosting for drama, chocolate buttercream for height and flair, and cream cheese frosting for chocolate cake when you want tangy depth. Keep an eye on room temperature, and let frosting textures guide your design.
Chocolate Frosting Options and Fillings
Choose a finish that matches your cake’s mood. Use clear chocolate ganache ratios for sheen, a trusted chocolate buttercream recipe for height, and a balanced chocolate cream cheese frosting for tang. Round it out with smart cake fillings ideas that add lift, snap, and a pop of fruit.
Silky ganache: ratios and techniques
For a pourable glaze, go 1:1 heavy cream to dark chocolate by weight. For a spreadable layer, use 1:2 cream to chocolate. For truffles or a firm finish, 1:3 works best. These chocolate ganache ratios deliver predictable texture every time.
Simmer the cream, then pour over finely chopped 60–70% chocolate. Let it rest 2–3 minutes. Stir from the center until glossy. Add a pinch of salt and vanilla; for extra shine, mix in 1–2 tablespoons corn syrup. Cool to your target consistency, or whip briefly for a lighter spread.
Whipped chocolate buttercream: light and airy
Beat unsalted butter until pale. Add sifted powdered sugar, cocoa, a pinch of salt, and vanilla. Thin with cream. For deeper flavor, blend in melted, cooled dark chocolate. This chocolate buttercream recipe pipes clean borders and holds sharp edges.
Want a silkier style? Make Swiss meringue buttercream, then add melted chocolate and cocoa. It’s less sweet, smooth on the palate, and perfect under delicate decor.
Cream cheese chocolate frosting: tangy and rich
Beat full‑fat cream cheese with butter until satiny. Add powdered sugar, cocoa, vanilla, and a touch of salt. Keep it cool for stability, as chocolate cream cheese frosting softens in warm rooms.
This style pairs well with oil‑based cakes and offsets sweet layers. The result is a plush finish with gentle tang that still tastes deeply of cocoa.
Layer fillings: jam, mousse, and crunch elements
Brighten each bite with a thin raspberry jam filling or cherry preserves. Pipe a buttercream dam around edges to keep fruit in place. For a lighter middle, add a chocolate mousse filling stabilized with gelatin or firm whipped cream; refrigerate for clean slices.
Bring texture with cocoa nibs, feuilletine, or a praline crunch. For contrast, swipe in salted caramel or a thin peanut butter layer so flavors stack without slide.
| Component | Best Use | Texture | Key Ratio/Method | Stability Tips |
|---|---|---|---|---|
| Ganache (glaze) | Shiny pour-over finish | Fluid, glossy | 1:1 cream:chocolate; rest 2–3 min, stir from center | Use 60–70% cocoa; cool slightly before pouring |
| Ganache (spreadable) | Smooth frosting layer | Soft, velvety | 1:2 cream:chocolate; whip briefly for lightness | Chill to set; add pinch of salt and vanilla |
| American Buttercream | Piping borders, everyday cakes | Light, sweet | Cream butter; add sugar, cocoa, vanilla, cream | Use room‑temp butter; sift dry ingredients |
| Swiss Meringue Buttercream | Silky finishes, refined decor | Silky, less sweet | Cooked meringue + butter; add melted chocolate | Warm bowl gently if curdled; keep cool to hold shape |
| Cream Cheese Chocolate | Tang for rich cakes | Plush, tangy | Cream cheese + butter; sugar, cocoa, vanilla | Chill before piping; avoid warm environments |
| Raspberry Jam Filling | Fruit brightness | Smooth, vibrant | Thin layer; dam with buttercream | Spread on cooled layers to prevent bleed |
| Chocolate Mousse Filling | Airy contrast | Light, creamy | Whipped cream + melted chocolate; optional gelatin | Refrigerate to set; slice with warm knife |
| Crunch Element | Textural pop | Crisp, snappy | Cocoa nibs, feuilletine, or praline between layers | Seal with thin buttercream to protect crunch |
Pro tip: Plan layers with intention: anchor with a stable frosting, add a bright fruit note, then finish with smooth chocolate. This simple map keeps flavors clear and texture balanced.
Decorating Ideas for Stunning Presentation
These cake decorating ideas turn a simple chocolate cake into a showpiece you’ll be proud to share. Aim for clean lines or playful texture, and let flavor-forward details guide your style. Keep tools handy, chill between steps, and work on a turntable for control.

Smooth finishes and rustic swirls
For a smooth buttercream finish, use a bench scraper against the sides while the cake spins. Warm an offset spatula under hot water, dry it, then polish the edges. Chill to set before any extra flourishes.
Prefer character over polish? Try rustic frosting swirls with the back of a spoon. Sweep in loose S-curves and soft peaks. A pinch of Maldon sea salt adds crunch and highlights chocolate.
Piping borders and simple rosettes
Fit a bag with a Wilton 1M or Ateco 824 and practice piping rosettes on parchment. The frosting should be soft but stable, so it holds shape without tearing.
Pipe a neat border to frame the cake and hide base seams. Add small shells or tight piping rosettes around the top rim for a tidy, bakery-style finish.
Drips, shards, and fresh fruit accents
Create a chocolate drip with fluid, slightly warm ganache on a chilled cake. Test one drip to gauge flow, then work around the edge before filling the top. Let gravity do the art.
For height and drama, make chocolate shards by spreading tempered or melted chocolate on parchment, chilling, then snapping into pieces. Dust with cocoa or edible gold to catch the light, and anchor them in set frosting.
Finish with a fruit-topped cake for color and freshness—think blueberries, raspberries, or sliced strawberries. Pat fruit dry to prevent bleeding, and cluster pieces for balance and shine.
Quick recap: smooth buttercream finish for sleek looks, rustic frosting swirls for texture, piping rosettes to frame edges, chocolate drip for flair, chocolate shards for height, and a fruit-topped cake for a fresh pop.
Dietary Tweaks and Variations
Small changes can open big doors for chocolate lovers. Whether you bake a gluten-free chocolate cake, a dairy-free chocolate cake, or a vegan chocolate cake, the goal is the same: a moist crumb, deep cocoa notes, and clean, balanced sweetness. These flavor variations chocolate cake ideas keep technique simple and results reliable, even for a weekday bake.
Gluten-free swaps that keep texture tender
Use a reputable 1:1 flour blend with xanthan gum, such as King Arthur Measure for Measure or Bob’s Red Mill 1-to-1. Add a tablespoon of extra liquid to offset cocoa’s dryness and confirm your baking powder is certified gluten-free. For a gluten-free chocolate cake, check chocolate labels to avoid cross-contact, then mix just until combined for a soft, even crumb.
Dairy-free and vegan alternatives
Swap dairy milk with unsweetened almond, oat, or soy milk and stir in 1–2 teaspoons apple cider vinegar to mimic buttermilk. Choose neutral oil and plant-based butter like Miyoko’s or Country Crock Plant for frosting. For a vegan chocolate cake, use flax eggs, aquafaba, or Bob’s Red Mill Egg Replacer, and pick dairy-free chocolate from Enjoy Life or Guittard’s dairy-free lines for a smooth melt in a dairy-free chocolate cake.
Low-sugar approaches without sacrificing flavor
Reduce granulated sugar by 15–20% and boost perceived sweetness with extra vanilla or a shot of espresso, which also creates a bold espresso chocolate cake profile. Consider a partial swap with light brown sugar or use erythritol–monk fruit blends labeled for baking. Expect a slightly different crumb, and use 70% bittersweet chocolate in frostings to keep a low sugar chocolate cake lush yet balanced.
Flavor twists: orange, mint, chili, and peanut butter
Stir in 1–2 teaspoons orange zest and a splash of Grand Marnier for a bright citrus note, or add 1/2–3/4 teaspoon peppermint extract for a cool, clean finish. A pinch of cayenne or 1–2 teaspoons ancho chili powder adds gentle heat, while warmed peanut butter swirls or a peanut butter filling bring rich contrast. Espresso powder, hazelnut praline, or salted caramel also enrich flavor variations chocolate cake without adding fuss.
Conclusion
This chocolate cake guide brings it all together: start with quality cocoa and real chocolate that match your flavor goals. Measure with care, mix with purpose, and keep gluten in check. Balance moisture with buttermilk or sour cream and oil, then prepare pans well and verify heat with an oven thermometer. These best chocolate cake tips make it easier to bake chocolate cake at home with confidence.
Watch for visual cues as layers bake—domed tops, set edges, and a springy center—and confirm doneness with an instant-read thermometer. Let layers cool fully before leveling and filling so the crumb stays tender. For frosting, choose what suits the day: silky ganache for drama, whipped buttercream for lightness, or cream cheese frosting when you want a tangy edge. That simple focus leads to chocolate cake success time after time.
Decorate with intention, whether sleek and smooth or rustic with bold swirls, and add drips, shards, or fresh berries for contrast. Store your homemade dessert correctly—covered at room temperature for short stints or well wrapped and chilled or frozen for longer. With smart choices and steady technique, you can bake chocolate cake at home that stays moist, tastes deep, and fits any table, from a weekday slice to a showstopper celebration.